Students(Delegates should follow instructions in column to the right) |
Delegates
|
| Find Student's Harvard ID (HUID) | |
Making Payments |
|
| Make a Payment | Make a Payment |
| Enroll in Monthly Payment Plan | Enroll in Monthly Payment Plan |
|
Invoice/Account Details |
|
| Review Your Amount Due and Due Date | Review Student's Amount Due and Due Date |
| Review Your Account Details | Review Student's Account Details |
| Print a Copy of Your Account Statement | Print Student's Account Statement |
| Review Third-Party Sponsor Details | |
| View Your Receipts and Communication History | |
| Direct Deposit | |
| Tax Forms | |
| View 1098-T | View 1098-T |
| Sharing Access | |
| Edit Delegate Access | |
| Remove a Delegate | |
| Tax IDs | |
| (Updating SSN or ITIN when "National ID Collection" appears as a To-Do prompt) | |
| Other | |
| Update/Create a physical location address in my.harvard |
Click on any image below to expand:
Student How-To:
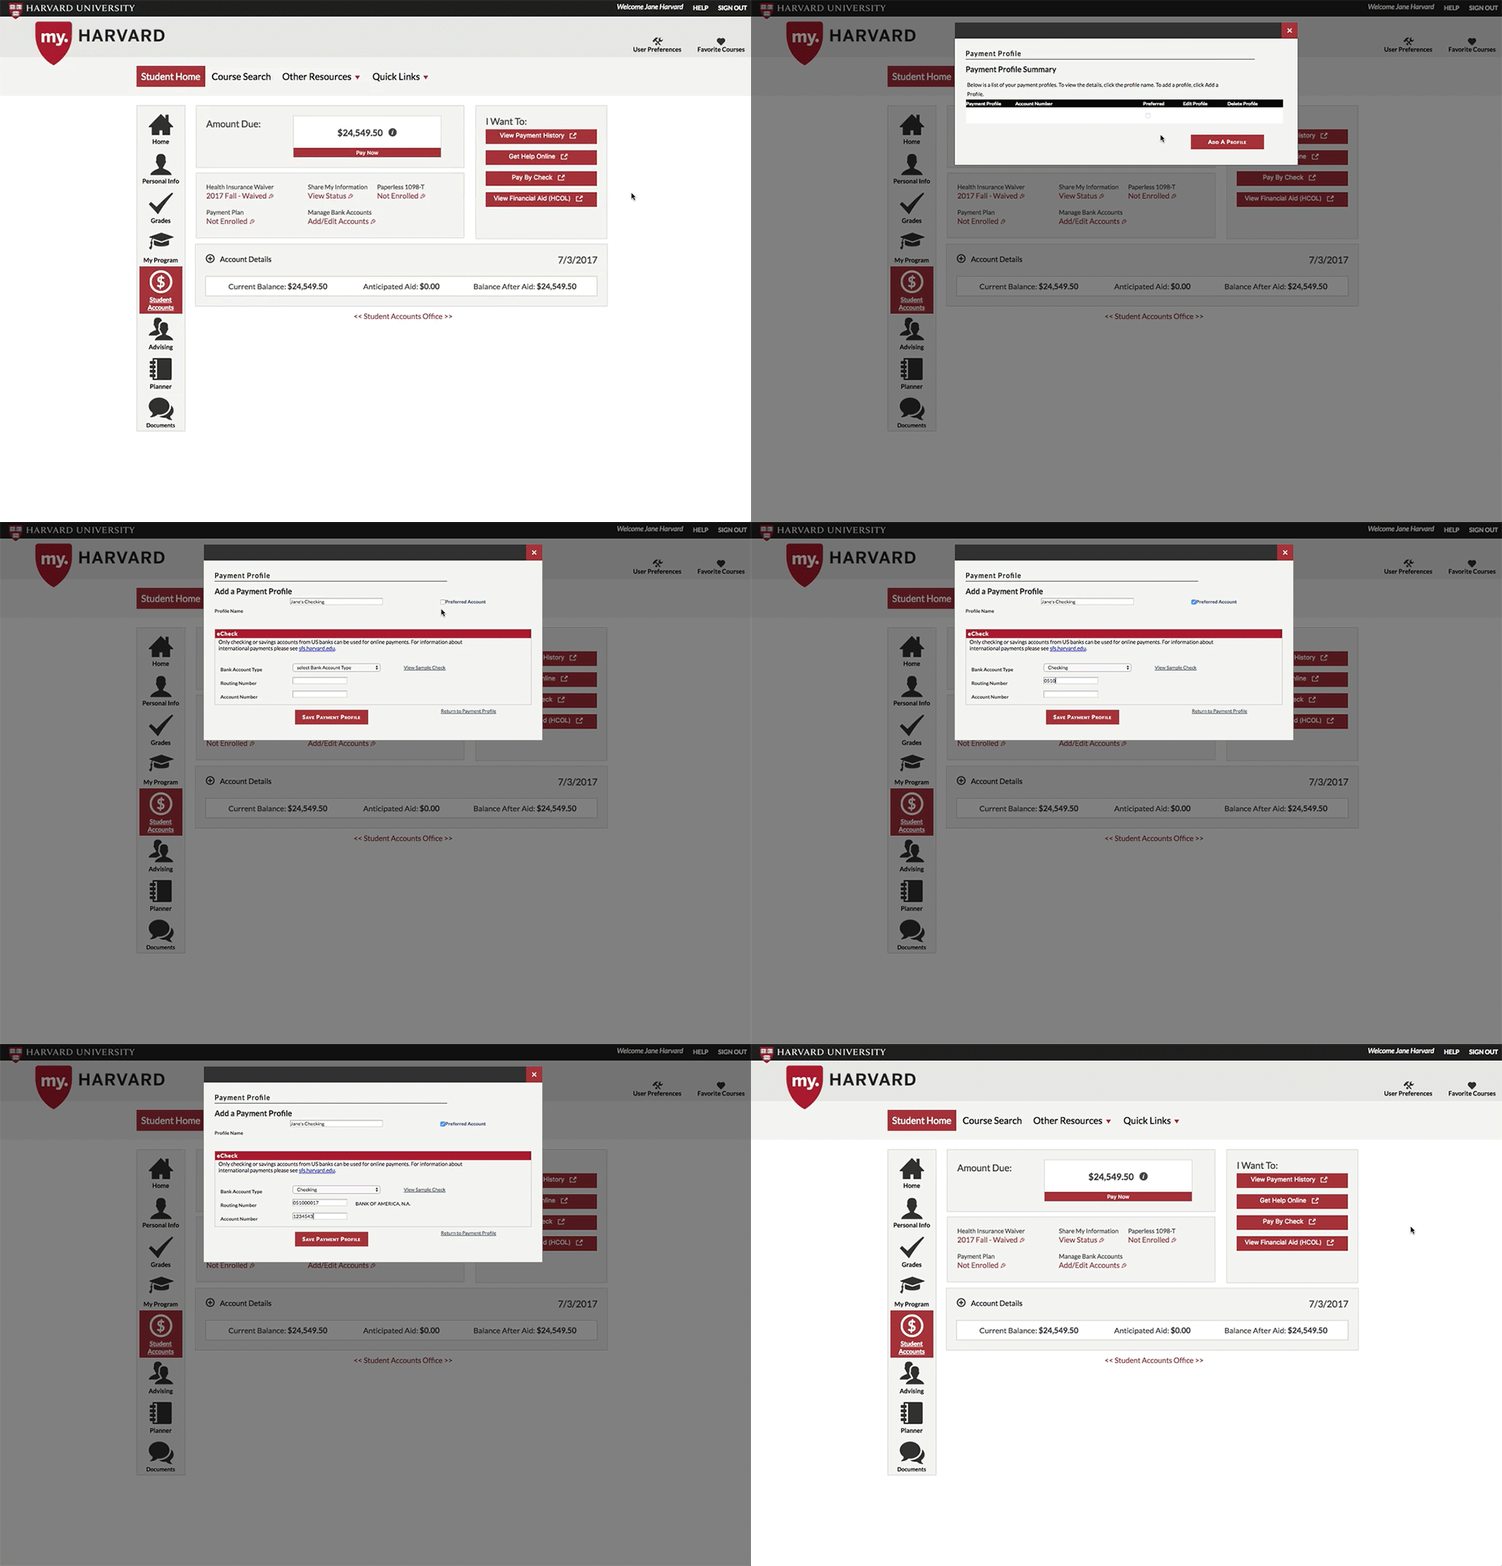
Creating a Payment Profile allows you to securely enter your U.S. checking or savings account information and save it to use whenever you need to make a payment. You can create a separate payment profile for each of your bank accounts.
-
Navigate to the Student Accounts page by selecting it from the left-hand menu
-
Click the link under Manage Bank Accounts
-
Click the link under Payment Profile
-
Click Add Profile
-
Give your profile a name and (optionally) check the box for Preferred Account
-
Enter your routing and account number (Only U.S. checking or savings accounts)* Please ensure you have the correct routing and account number.
-
Click Save Payment Profile to complete
*Unfortunately, no brokerage, investment, or Money Market accounts can be used. If you are not sure whether your account can be debited via ACH, please contact your financial institution before making the payment.
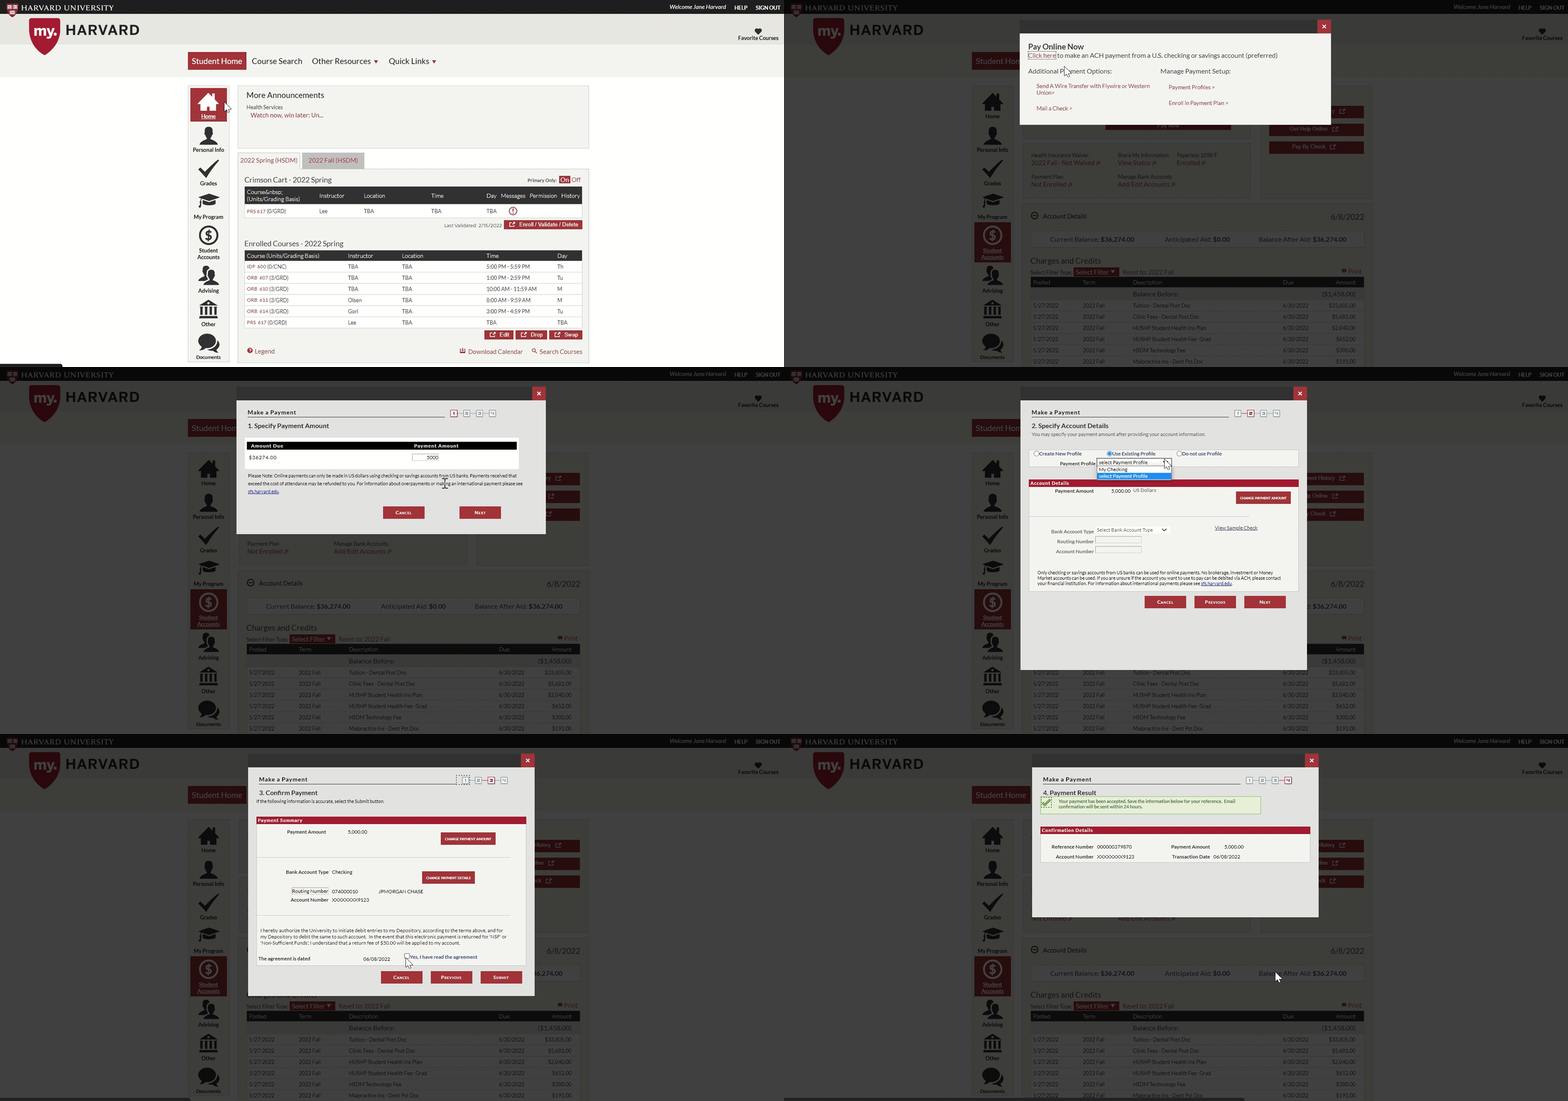
Process an electronic transfer of funds from your U.S. checking or savings account to pay due charges on your student account.
-
Navigate to the Student Accounts page by selecting it from the left-hand menu
-
Beneath the Amount Due box, select Pay Now
-
From the pop-up, select Pay Online Now (Please note that you can also pay by wire transfer or check, but online payments are the most efficient (and our preferred) method)).
-
Enter the amount you would like to pay (This does not have to be the same as the amount due).
-
Use an existing payment profile, save account information for a new profile, or enter account information for a one-time payment.
-
If you do not select an existing profile, enter your bank account information (Only U.S. checking or savings accounts)* Please ensure you have the correct routing and account number.
-
Select Next
-
Check the agreement box, and select Submit
Unfortunately, no brokerage, investment, or Money Market accounts can be used. If you are not sure whether your account can be debited via ACH, please contact your financial institution before making the payment.
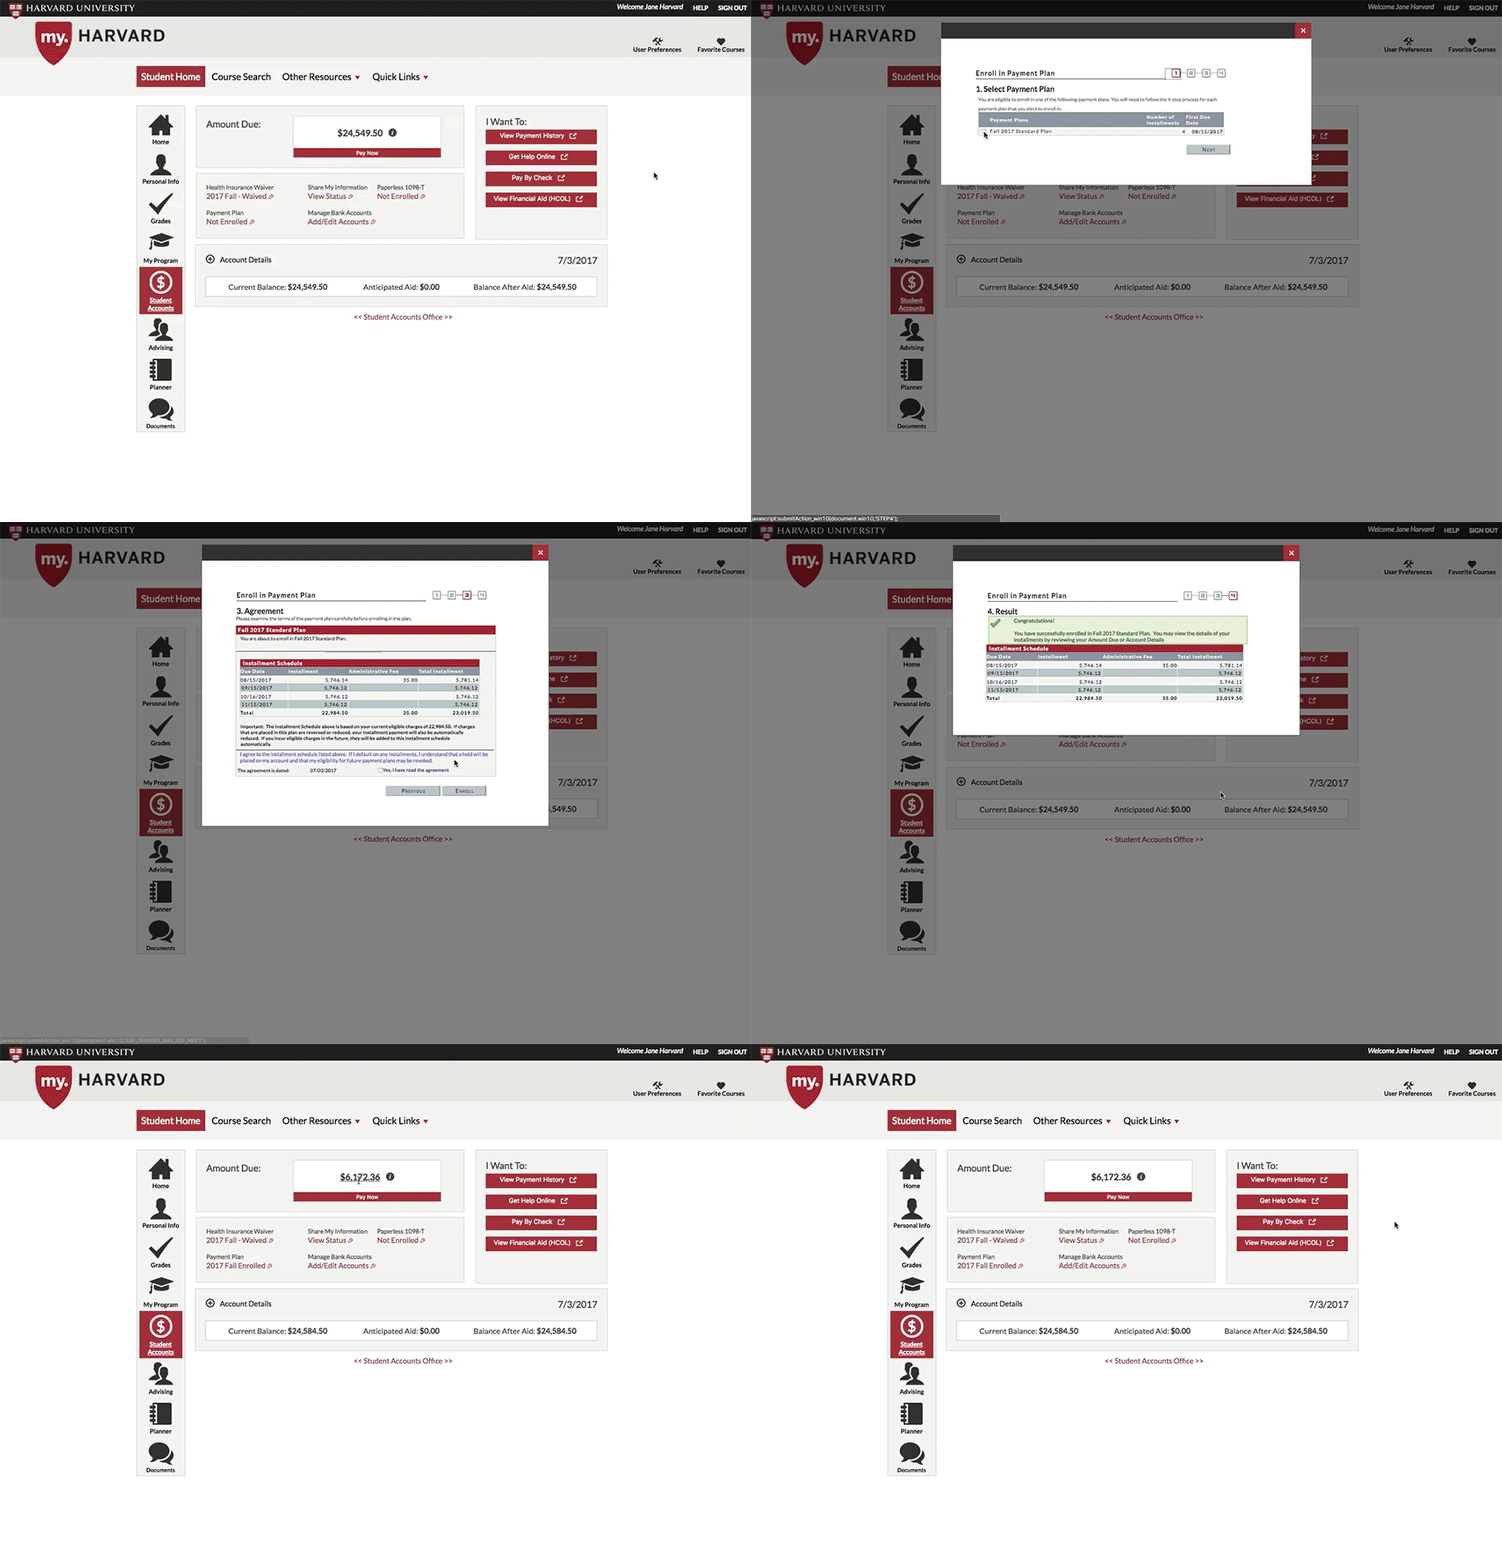
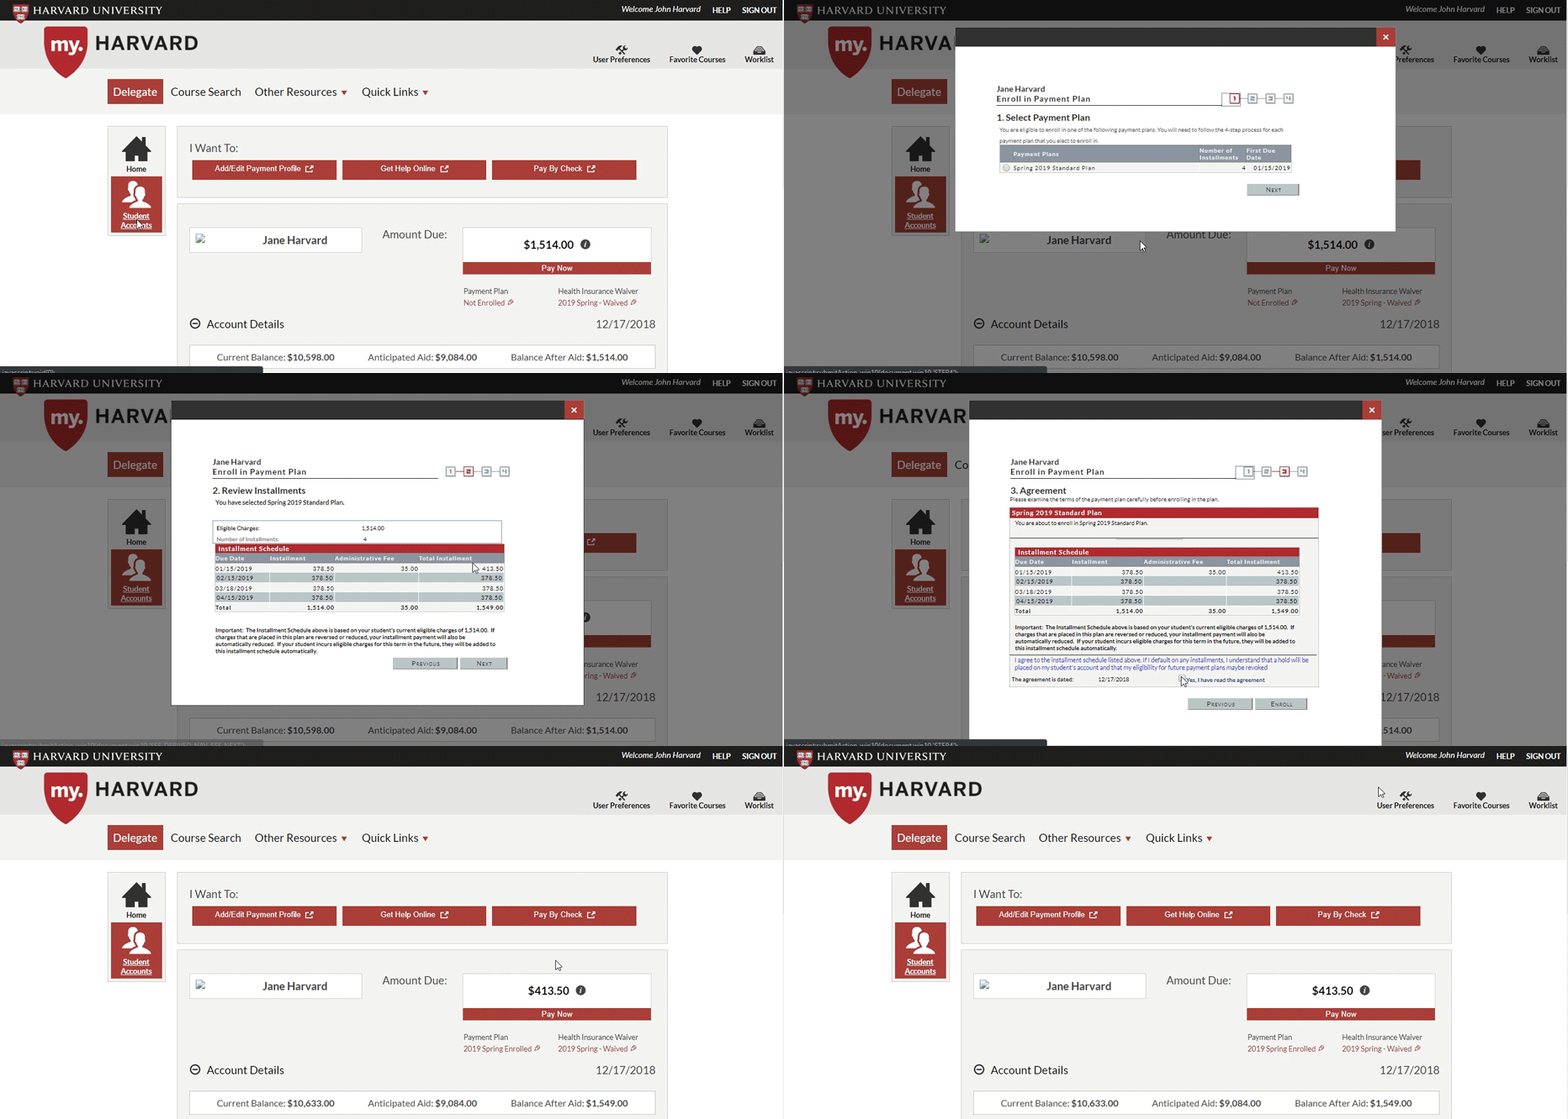
Enroll in Monthly Payment Plan
Details about terms and eligibility for the Monthly Payment Plan are available here.
-
Navigate to the Student Accounts page by selecting it from the left-hand menu
-
In the Amount Due section, click the link under Payment Plan
-
Select the plan and click Next
-
Read and agree to terms. Select Enroll
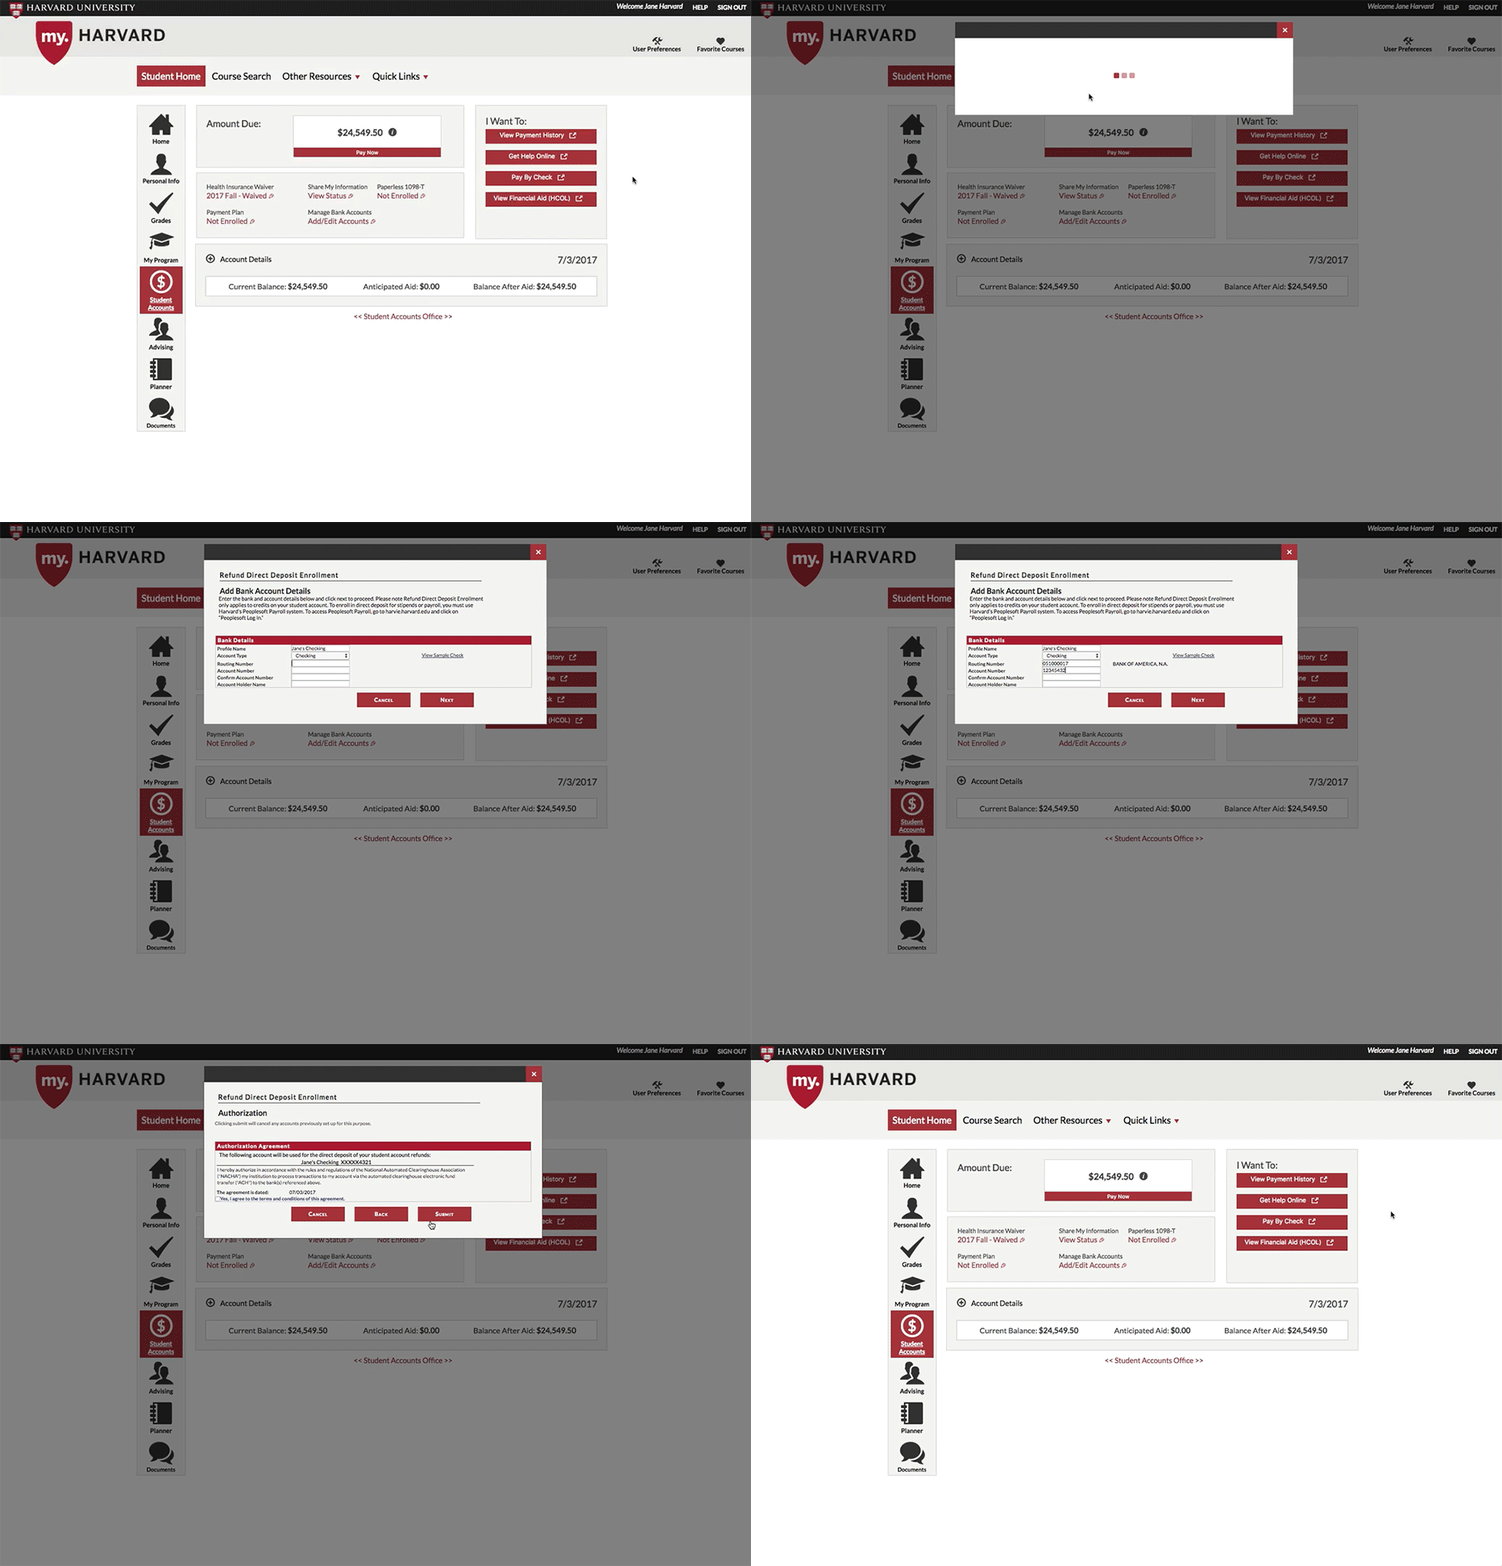
Enroll in Direct Deposit for Student Account Refunds
Enter the banking information required to deposit student account refunds in your U.S. checking or savings account.
-
Navigate to the Student Accounts page by selecting it from the left-hand menu
-
Click the link under Manage Bank Accounts
-
Click the link under Refund Direct Deposit
-
Click Add Account or Use a New Account
-
Enter a name for your profile
-
Select the account type and enter the routing and account number associated with this bank account. Please take the time to ensure your account and routing number are accurate, as payments deposited into the wrong account cannot be retrieved after 5 days.
-
Click Next
-
Check the box to agree to the terms and conditions, and hit Submit
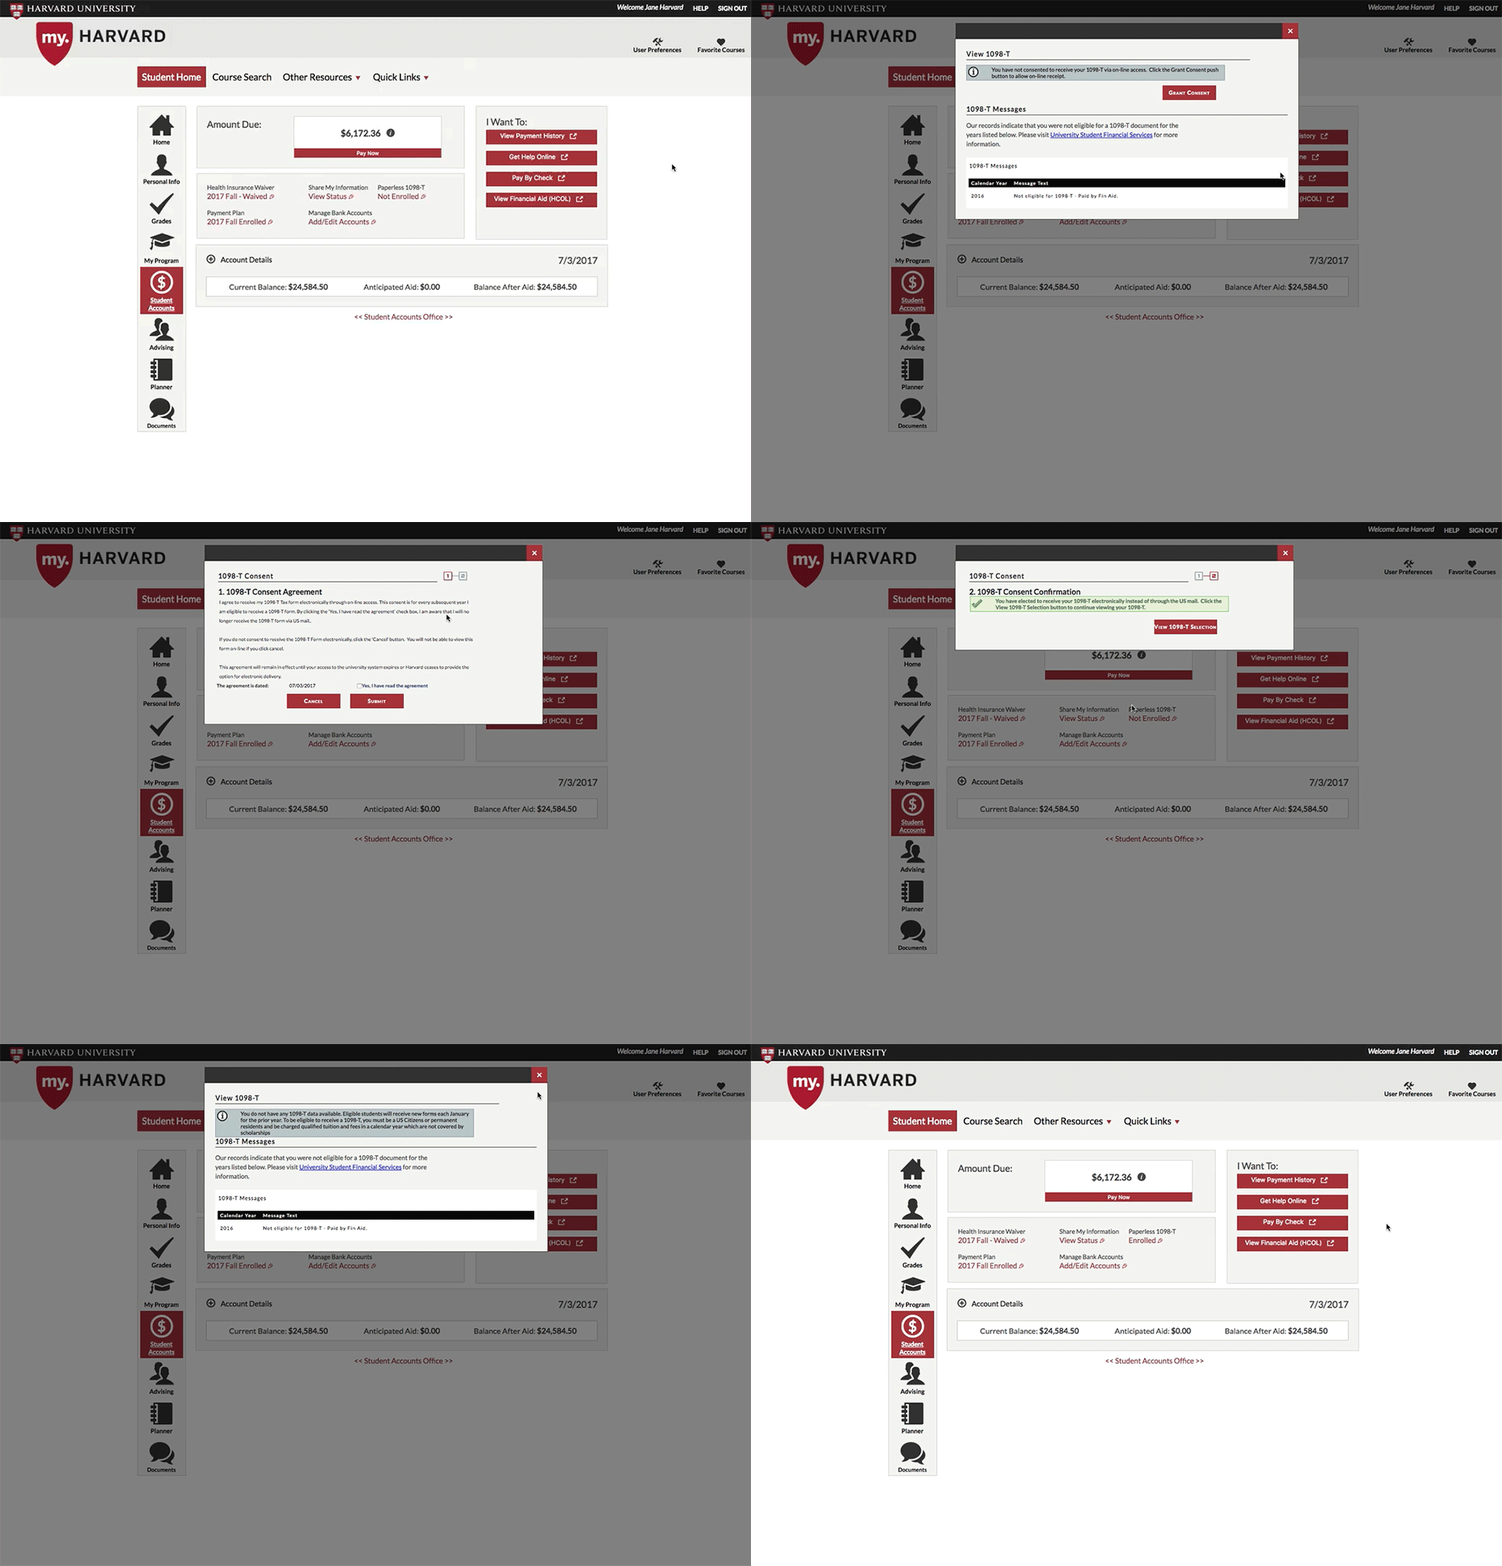
Grant consent to receive your 1098-T tax form electronically.
-
Navigate to the Student Accounts page by selecting it from the left-hand menu
-
Click the link under Paperless 1098-T
-
Review the terms and check the agreement box
-
Select Grant Consent
(Please note: If you did not opt-in to view your form electronically prior to the forms being issued in January, a paper copy should have been mailed to your permanent address. You can opt-in at any time to view your form electronically.)
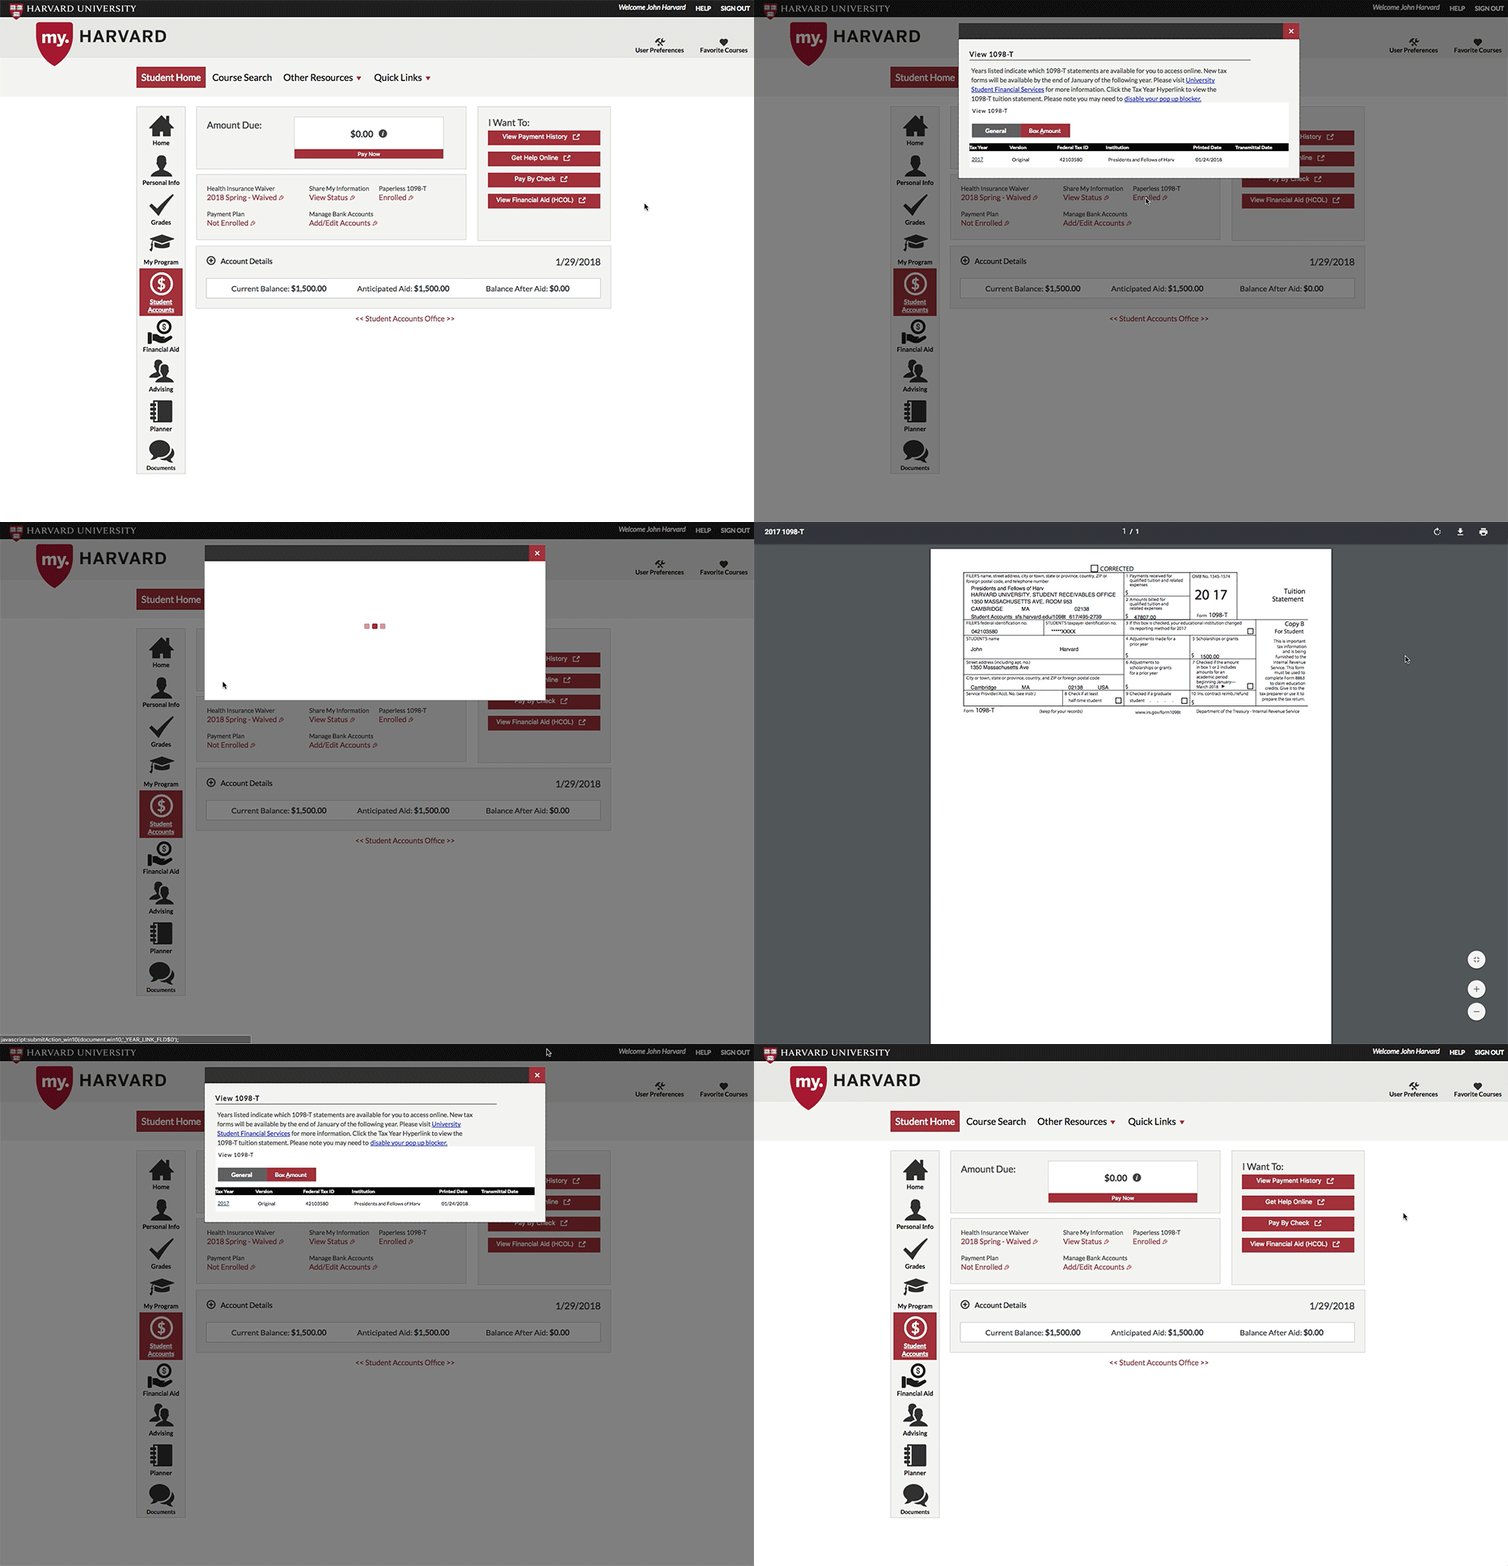
1. Navigate to the Student Accounts page by selecting it from the left-hand menu
2. Click the link under Paperless 1098-T (For delegate access, students must first grant access to view their 1098-T through the Share My Information page)
3. Select the applicable tax year
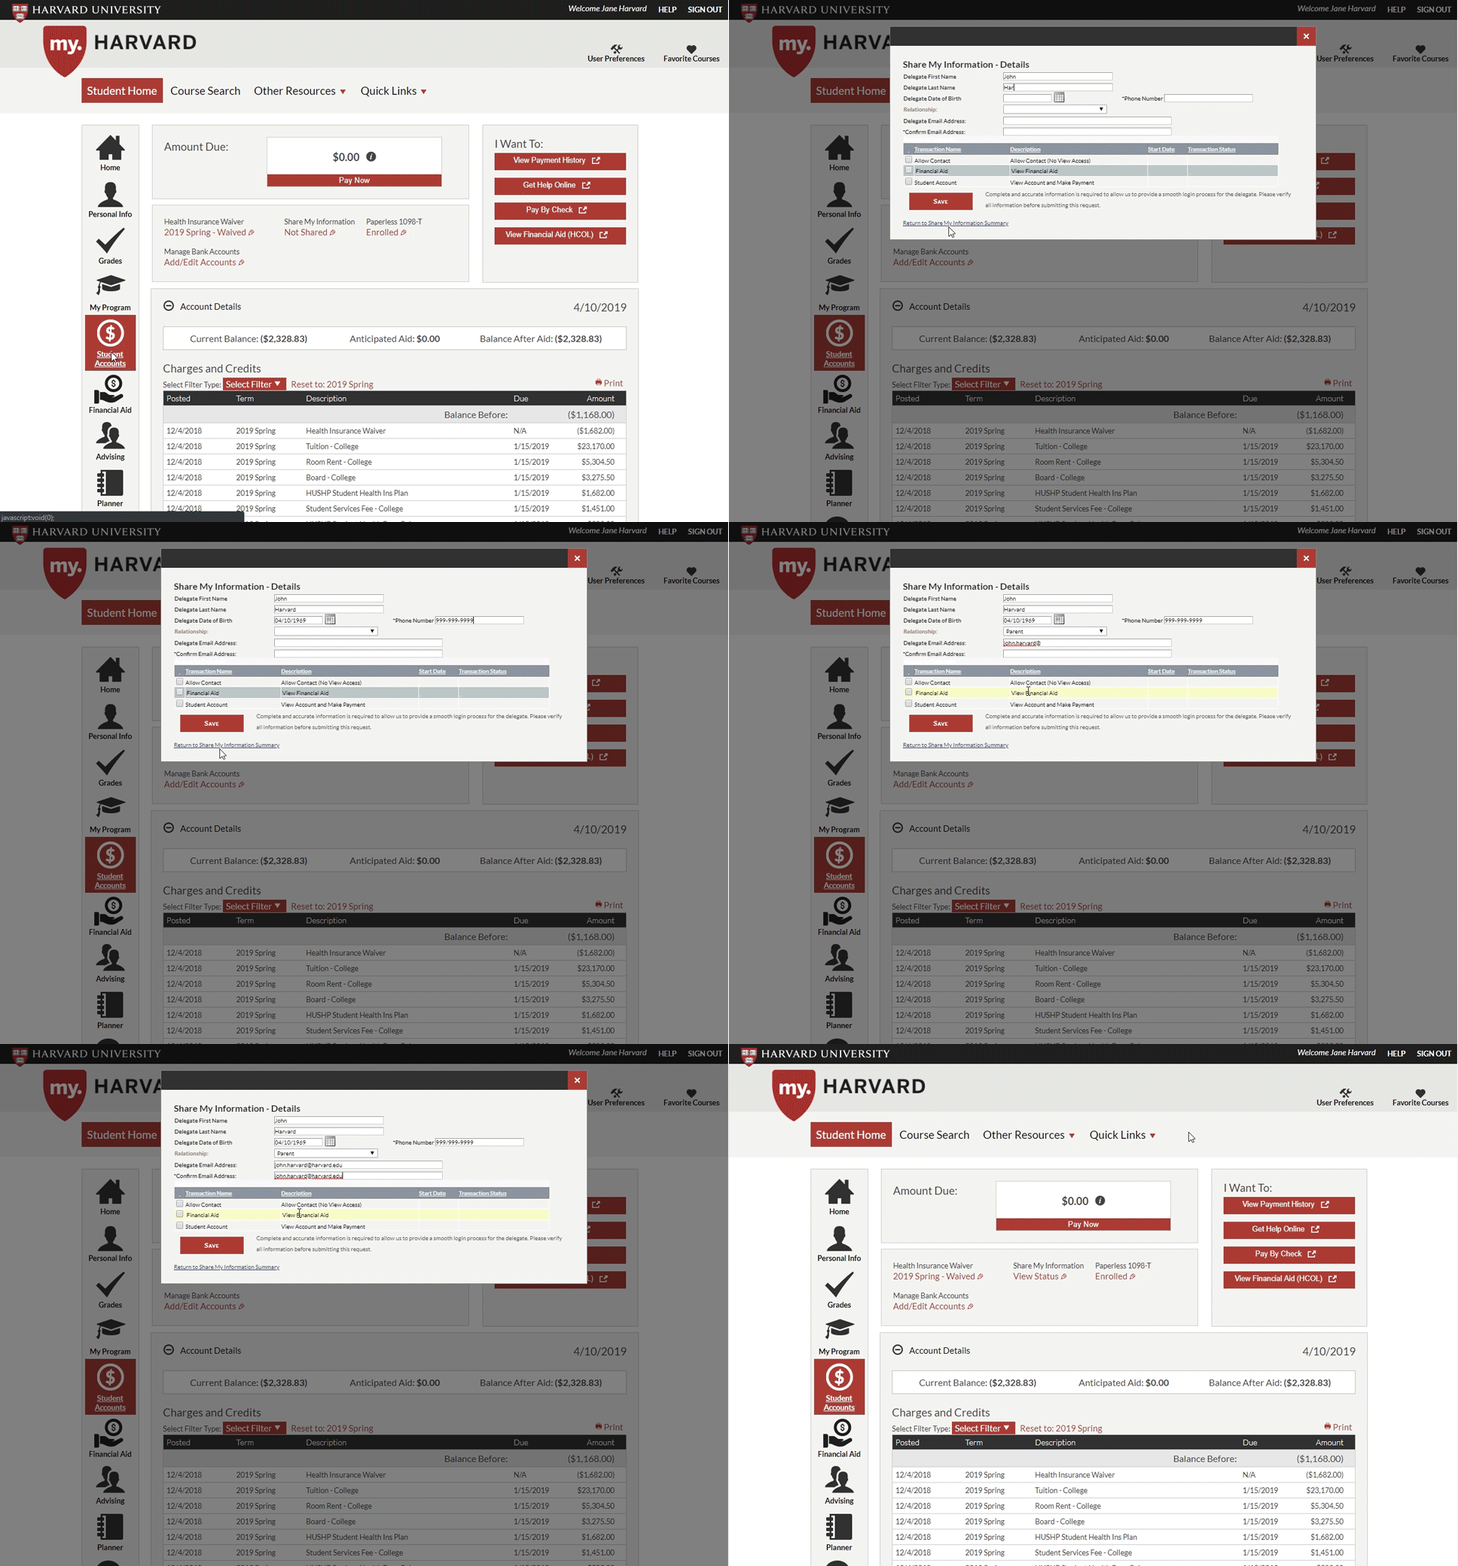
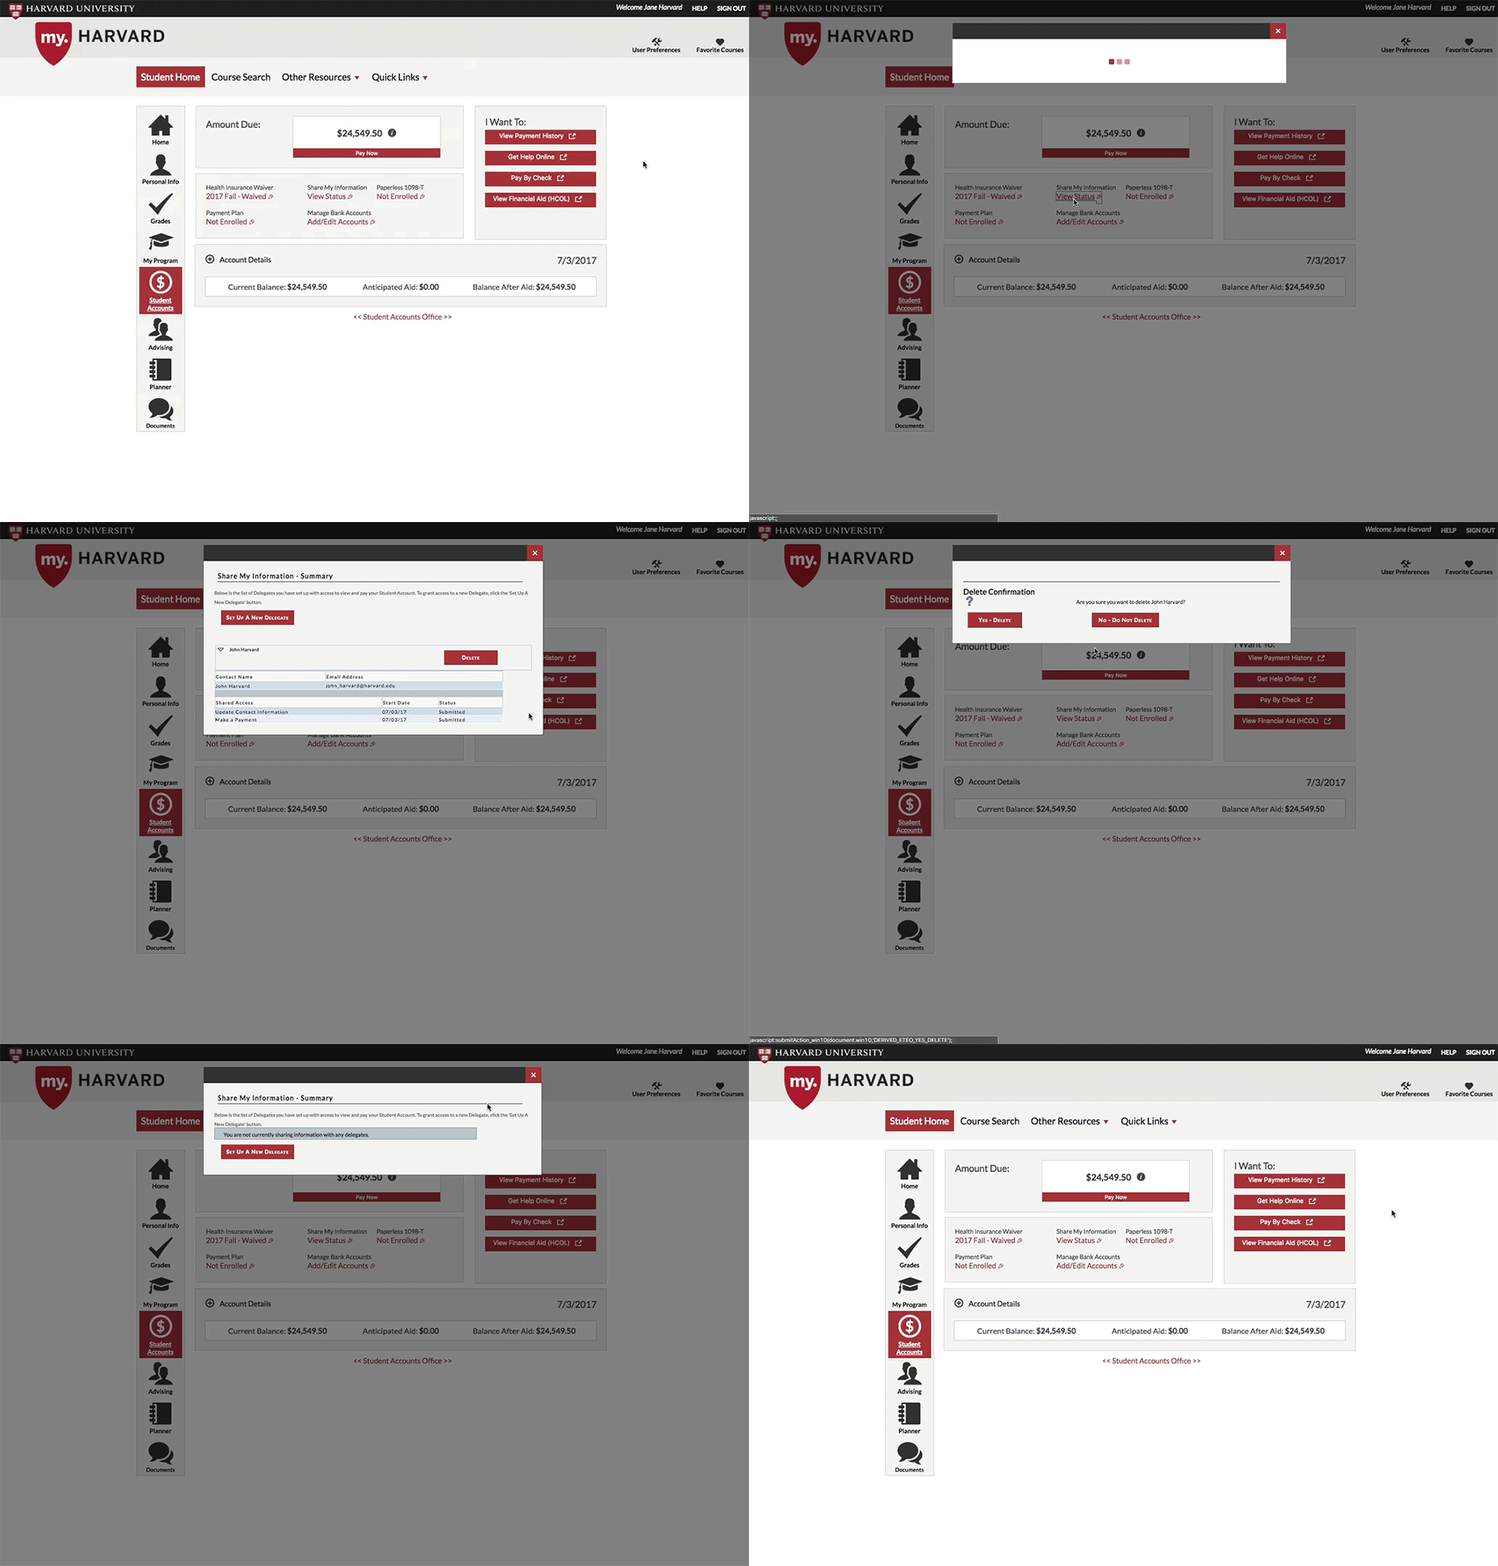
Share Information with a Delegate
Sharing your information with a delegate allows them to view and make payments to your student account. You will need to know the email address and date of birth of each person you set up as a delegate.
While you have the option of updating preferred names and pronouns in my.harvard, your delegate(s) will not be able to view these changes. Only your legal name, as it appears on billing statements, is visible to delegates.
-
Navigate to the Student Accounts page by selecting it from the left-hand menu
-
Click the link under Share My Information
-
Click the Set up a New Delegate button
-
The next screen shows Terms and Conditions, select I Accept or I Decline
-
Next you will need to enter your Delegate’s information and choose what records you want to share. Please note that you must submit a valid date of birth or the process will not be completed successfully.
-
Click Save and you will be asked to confirm the new delegate. Select OK
-
Your delegate will receive an email containing instructions for claiming a HarvardKey and accessing the account within 48 hours.
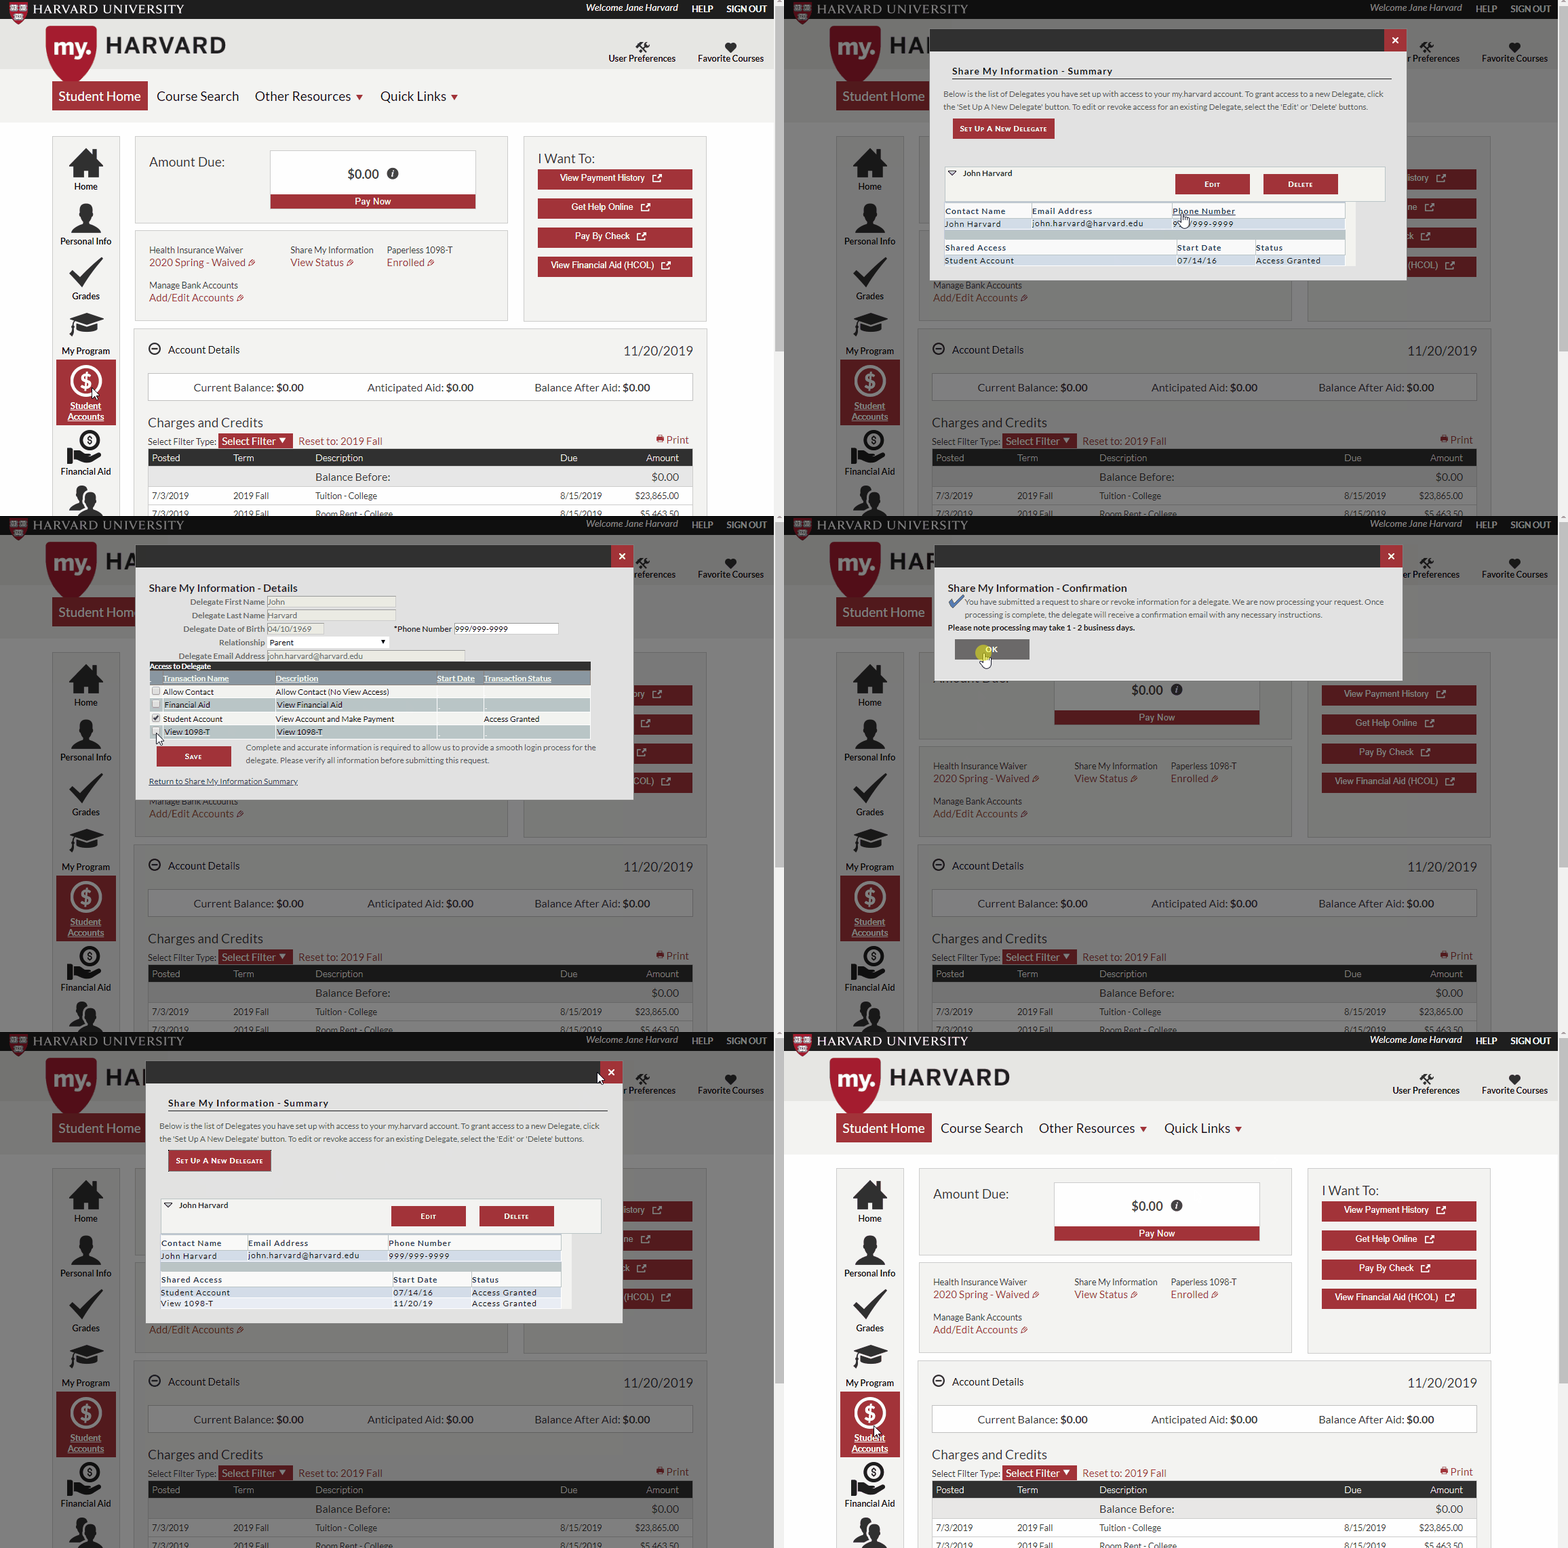
You can follow these instructions to modify the type of access previously granted to your delegate:
- Navigate to the Student Accounts page by selecting it from the left-hand menu
- Click the link under Share My Information
- Click the Edit button
- Check or un-check the box next to the access you would like to add or remove
- Click Save and you will be asked to confirm the edit. Select OK
- Your delegate's account view will be updated the next time they log into my.Harvard
If you no longer want a delegate to view or make payments to your student account, you can remove them.
-
Navigate to the Student Accounts page by selecting it from the left-hand menu
-
Select the link under Share My Information
-
Select the Delete button for the Delegate that you would like to remove, then confirm the deletion.
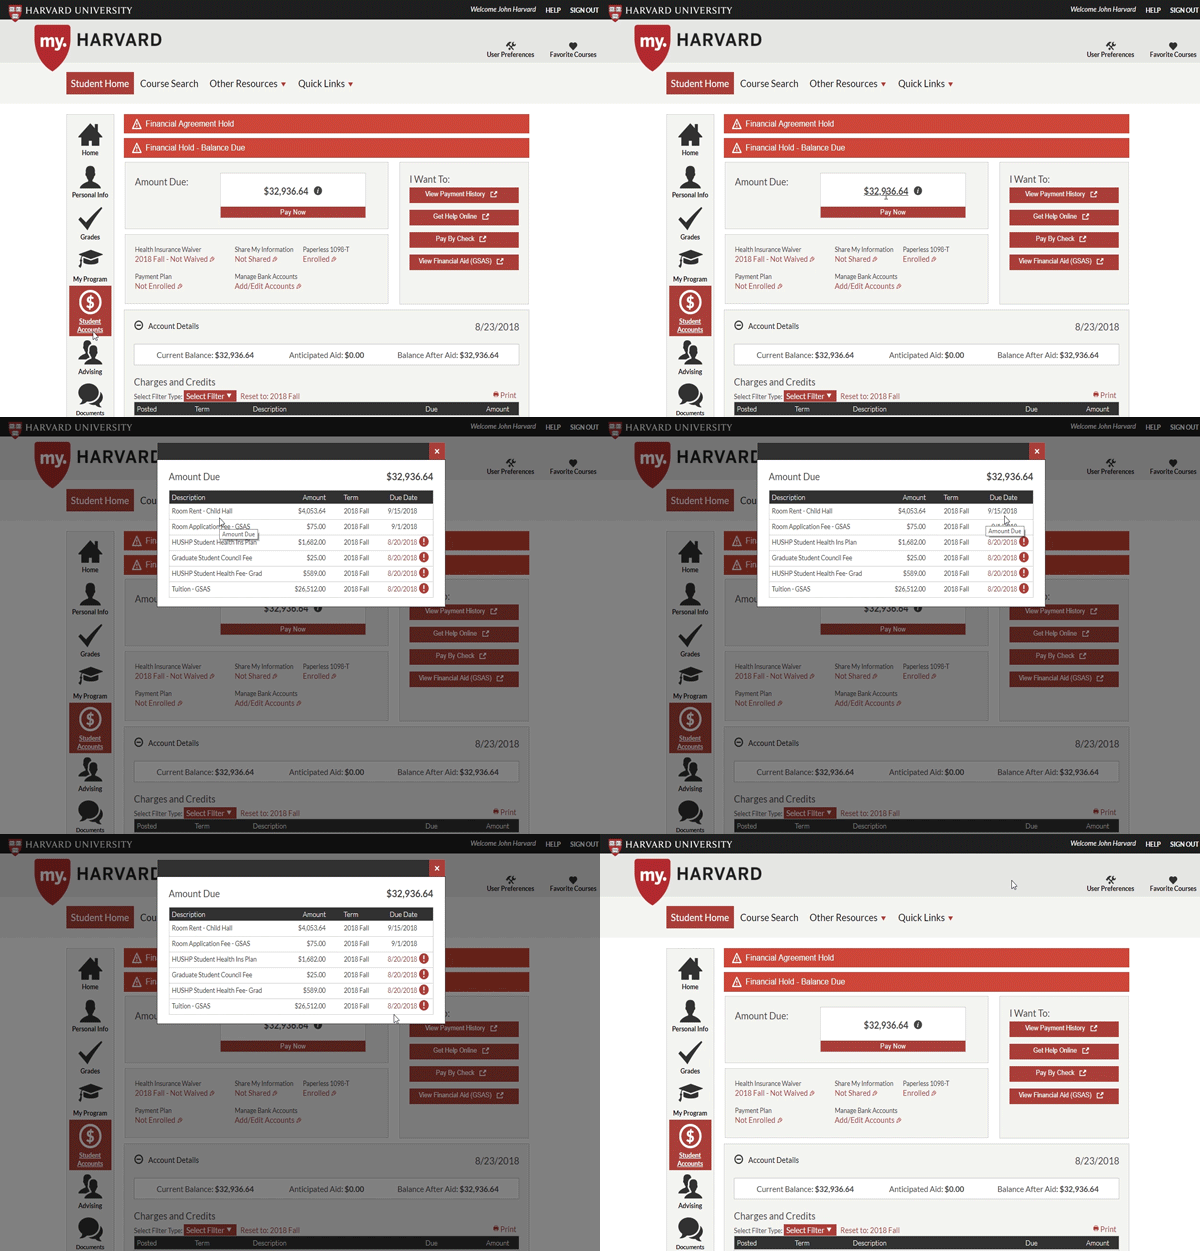
Review Your Amount Due and Due Date
-
Navigate to the Student Accounts page by selecting it from the left-hand menu
-
Click the Information Icon ("i") in the Amount Due box to view your due charges
-
Due dates, which vary by school, can be found in the far-right column.
-
If an information icon appears next to a charge, this means that the charge has been partially paid off or is partially covered by anticipated aid.
-
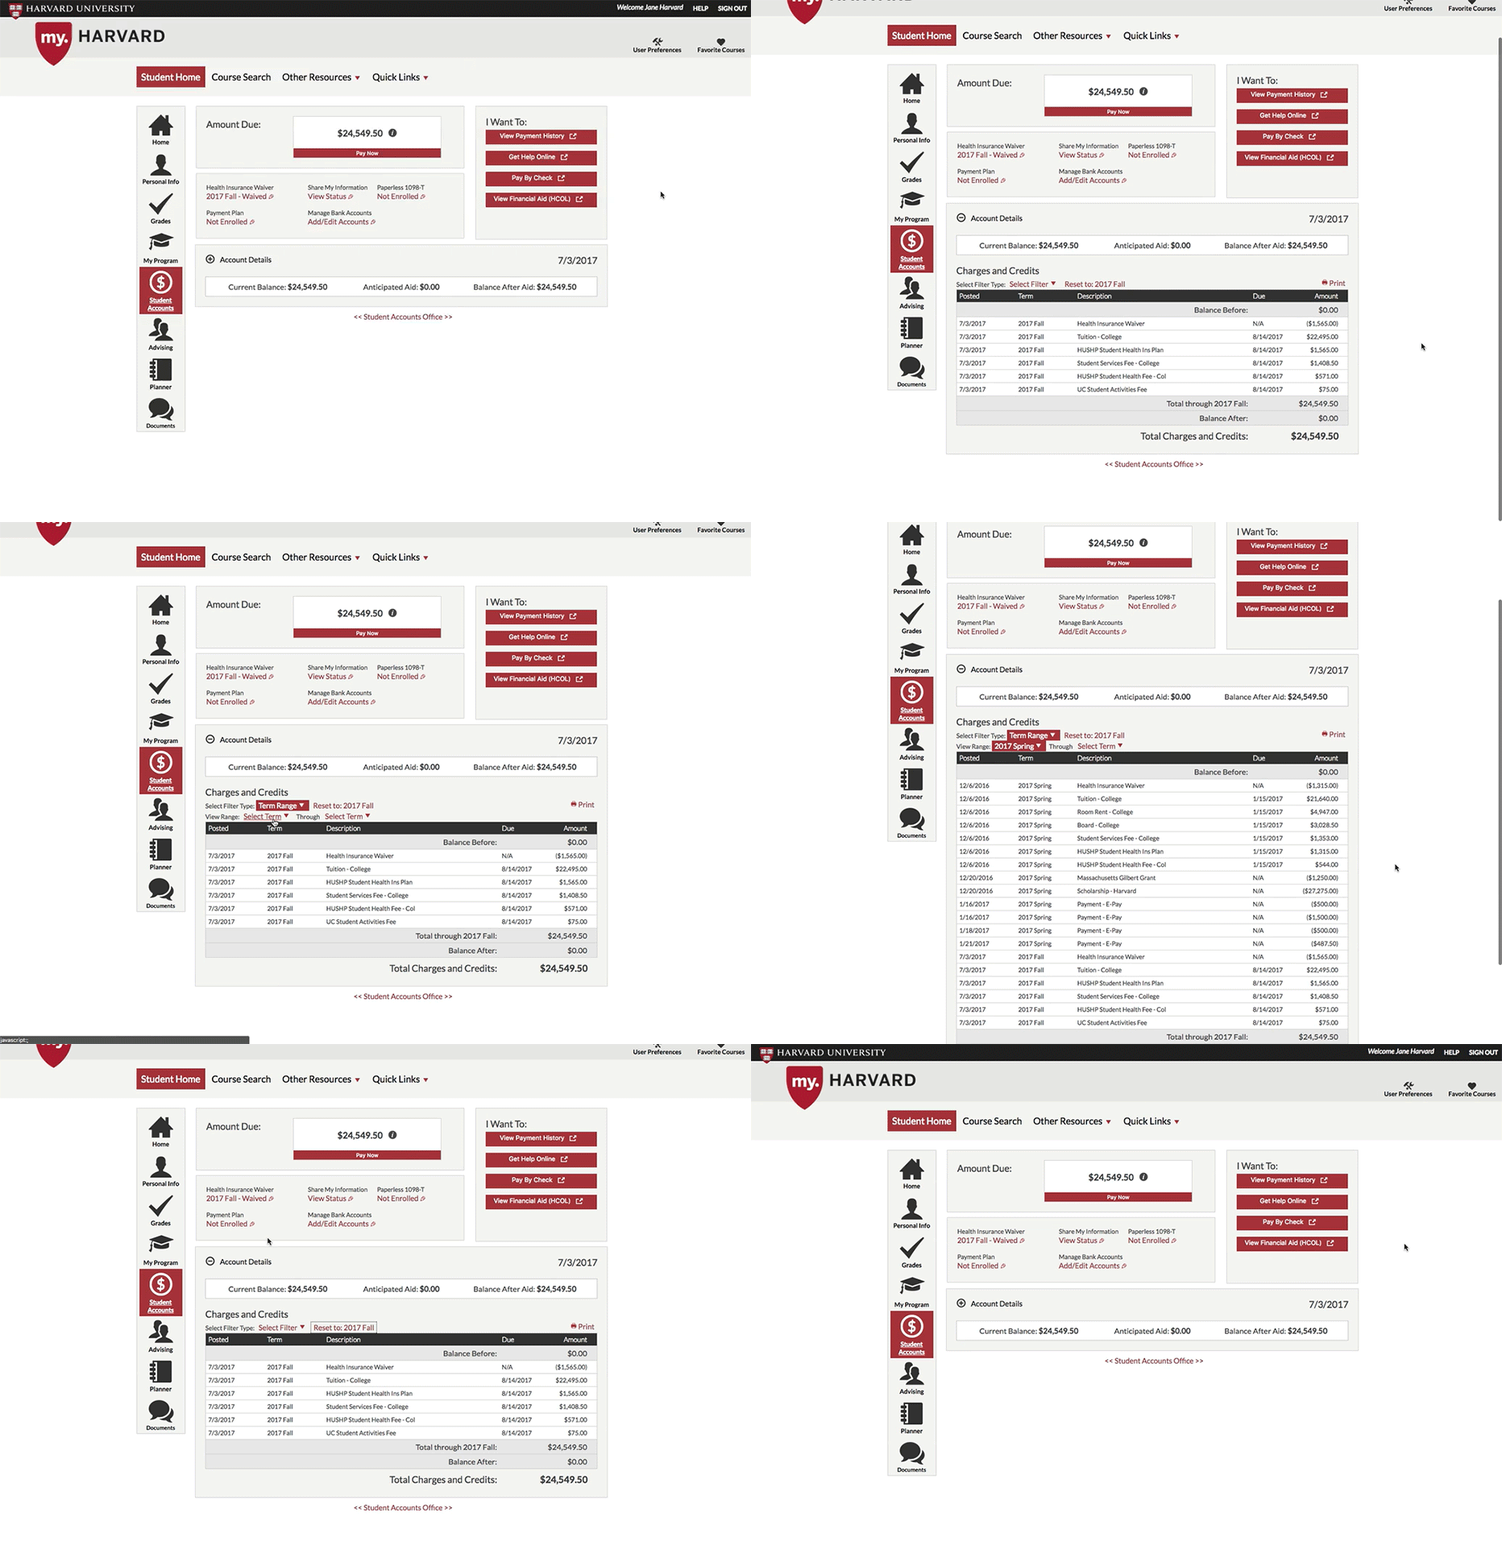
Navigate to Student Accounts in the left-hand menu
-
Go to the Account Details section (below Amount Due section)
-
Filter your transactions by date or term – see filter options under "Charges and Credits"
Review Third-Party Sponsor Details
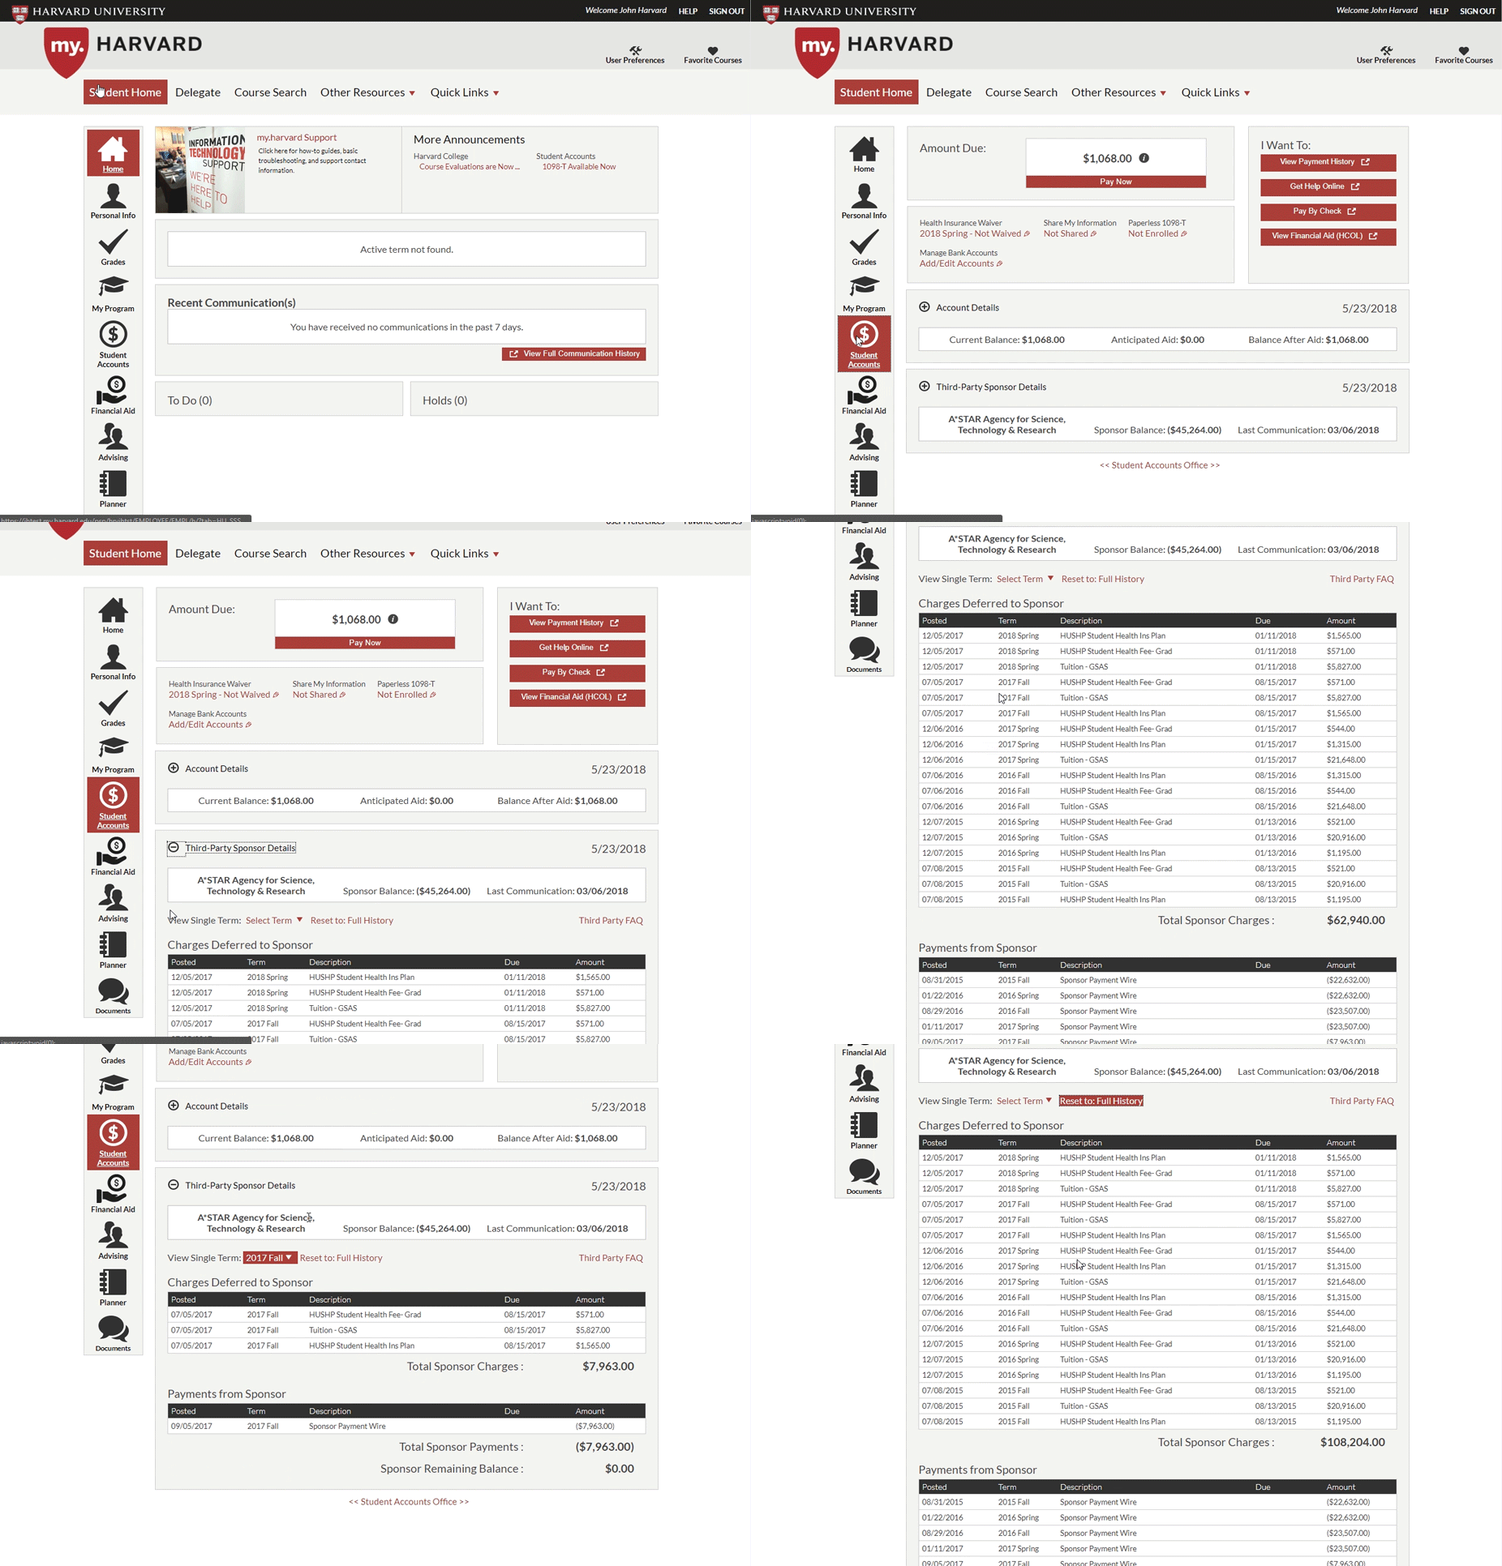
-
Navigate to Student Accounts in the left-hand menu
-
Expand the Third-Party Sponsor Details section
-
Filter transactions by term – see filter options above Charges Deferred to Sponsor
Print a Copy of Your Account Statement
-
Navigate to the Student Accounts page by selecting it from the left-hand menu
-
Go to the Account Details section (below Amount Due)
-
Filter your transactions by date or term – see filter options under Charges and Credits
-
Click on the red Print icon to the far right of Charges and Credits
View Your Receipts and Communication History
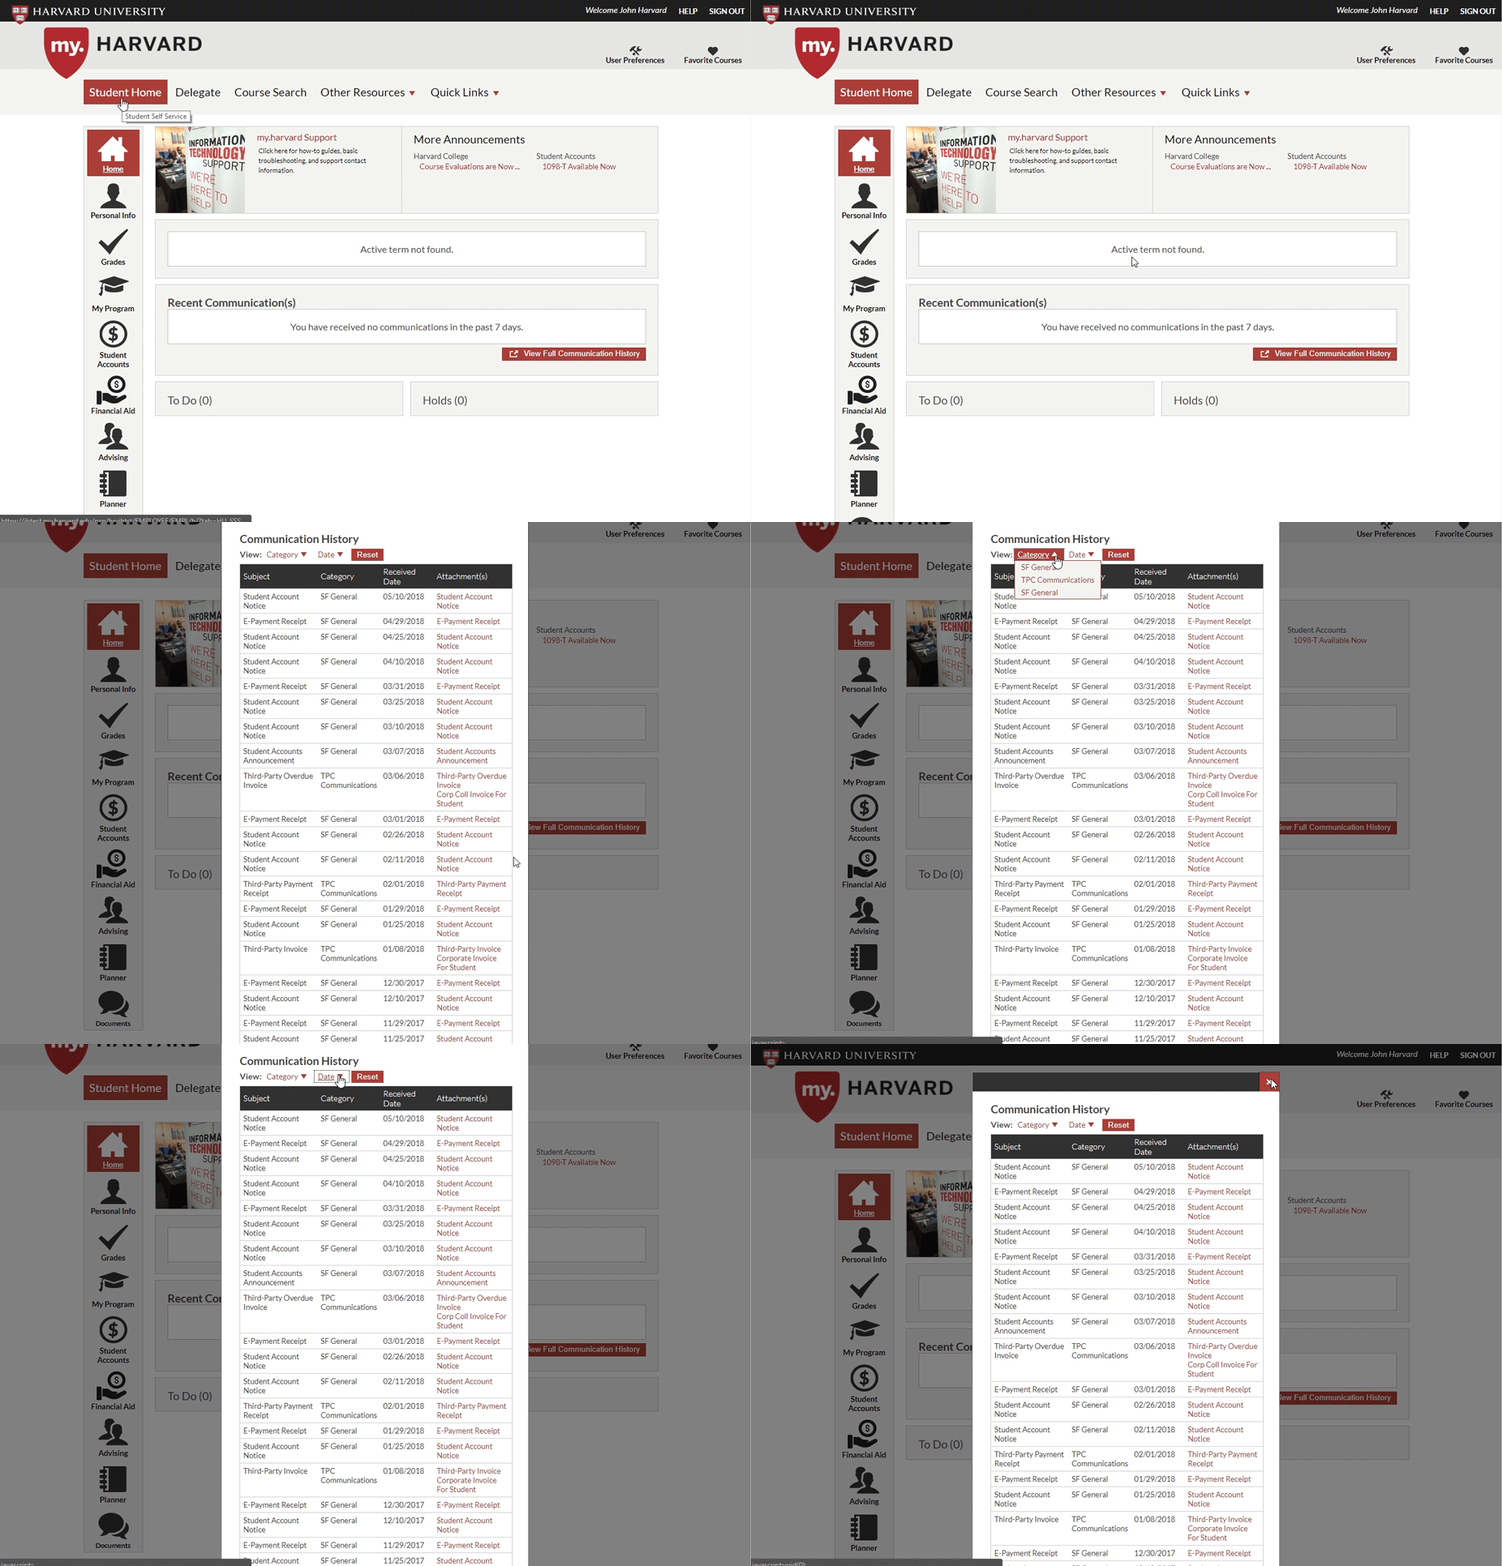
1. On the Student Home page, navigate to the View Full Communication HIstory tab under Recent Communication(s).
2. Filter by category and date
3. Select individual receipts/communications to view
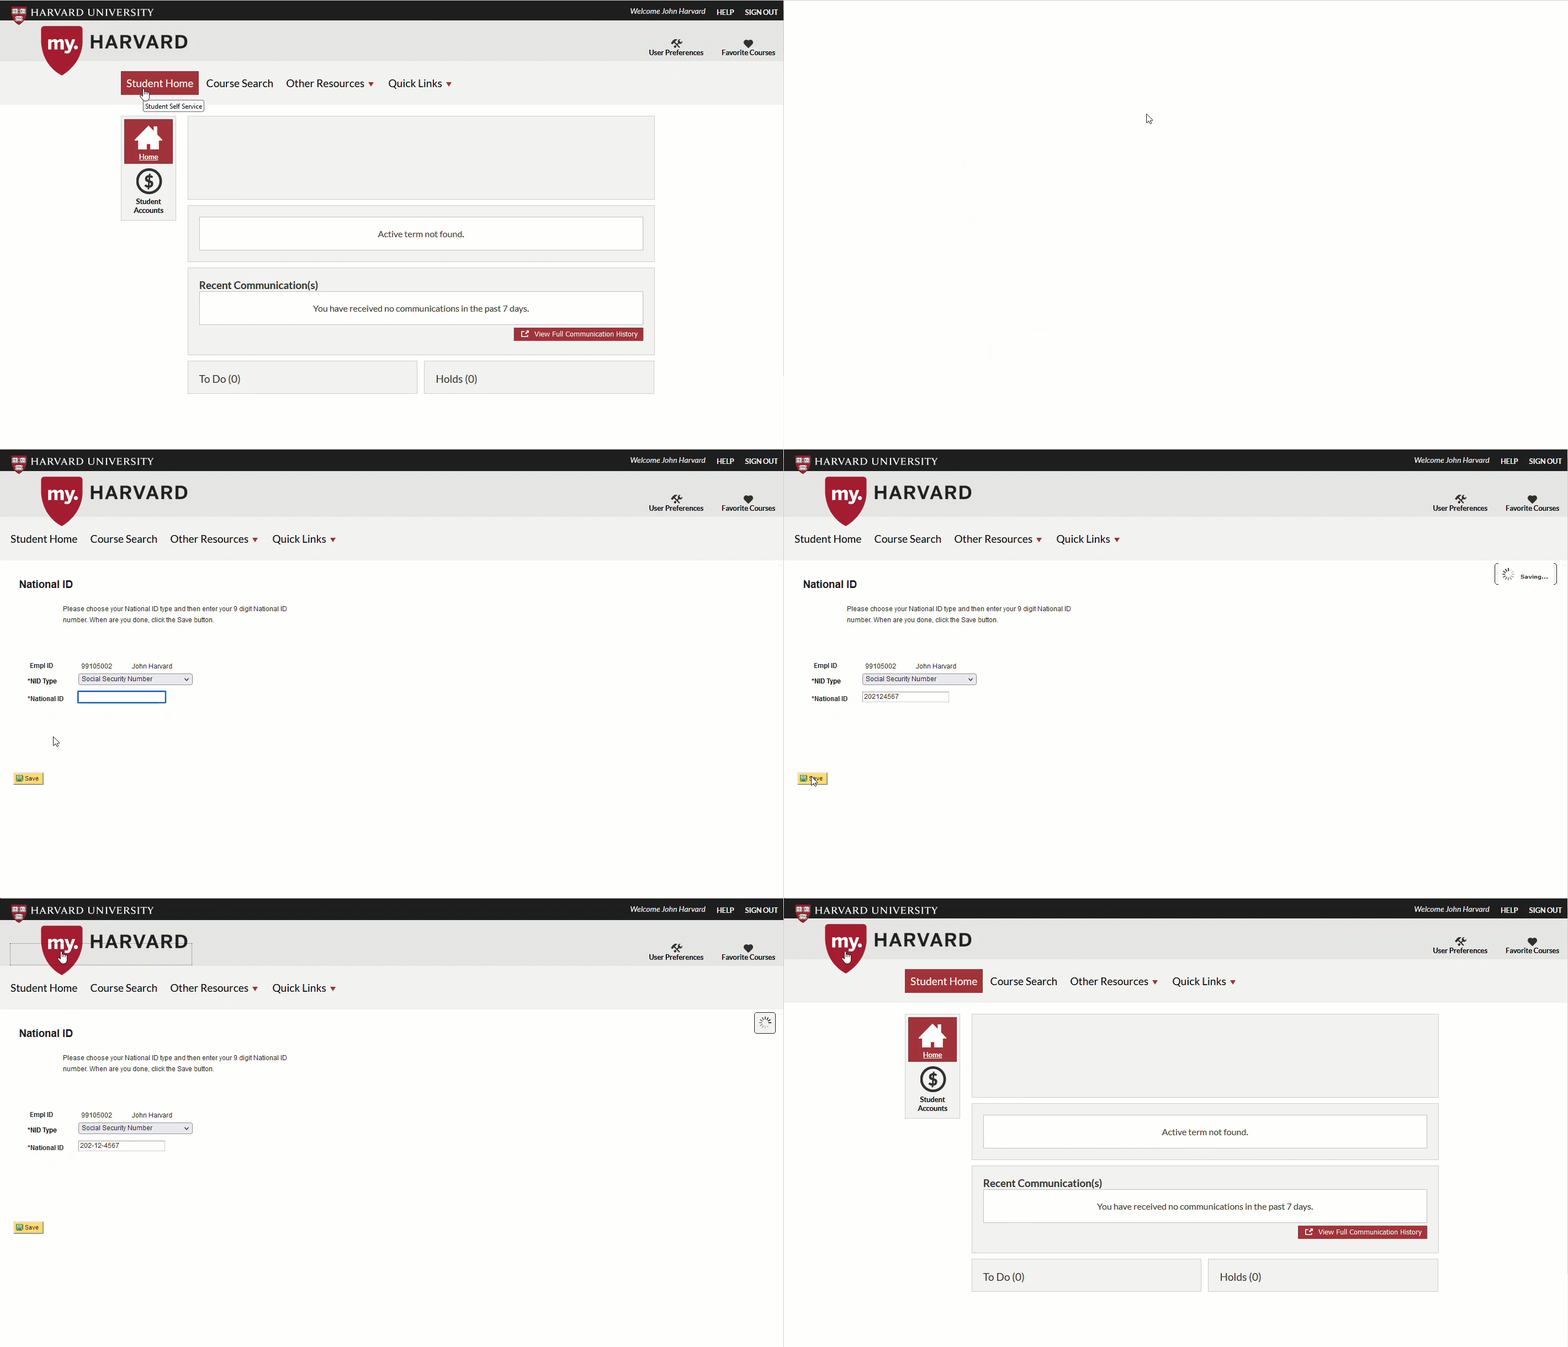
Submit SSN or ITIN at Any Time
Harvard requests your National ID number (SSN or ITIN) to ensure compliance with federal tax and academic reporting guidelines. If you've been instructed to submit your number to our office, you can do so at any time through the my.harvard portal.
1. Navigate to the Student Home page
2. Click on the Other Resources dropdown at the top of the page
3. Select the Update National ID/SSN menu option
4. Enter your 9-digit national ID number in the space provided
5. Click Save
6. Click on the my.harvard logo to return to Student Home.
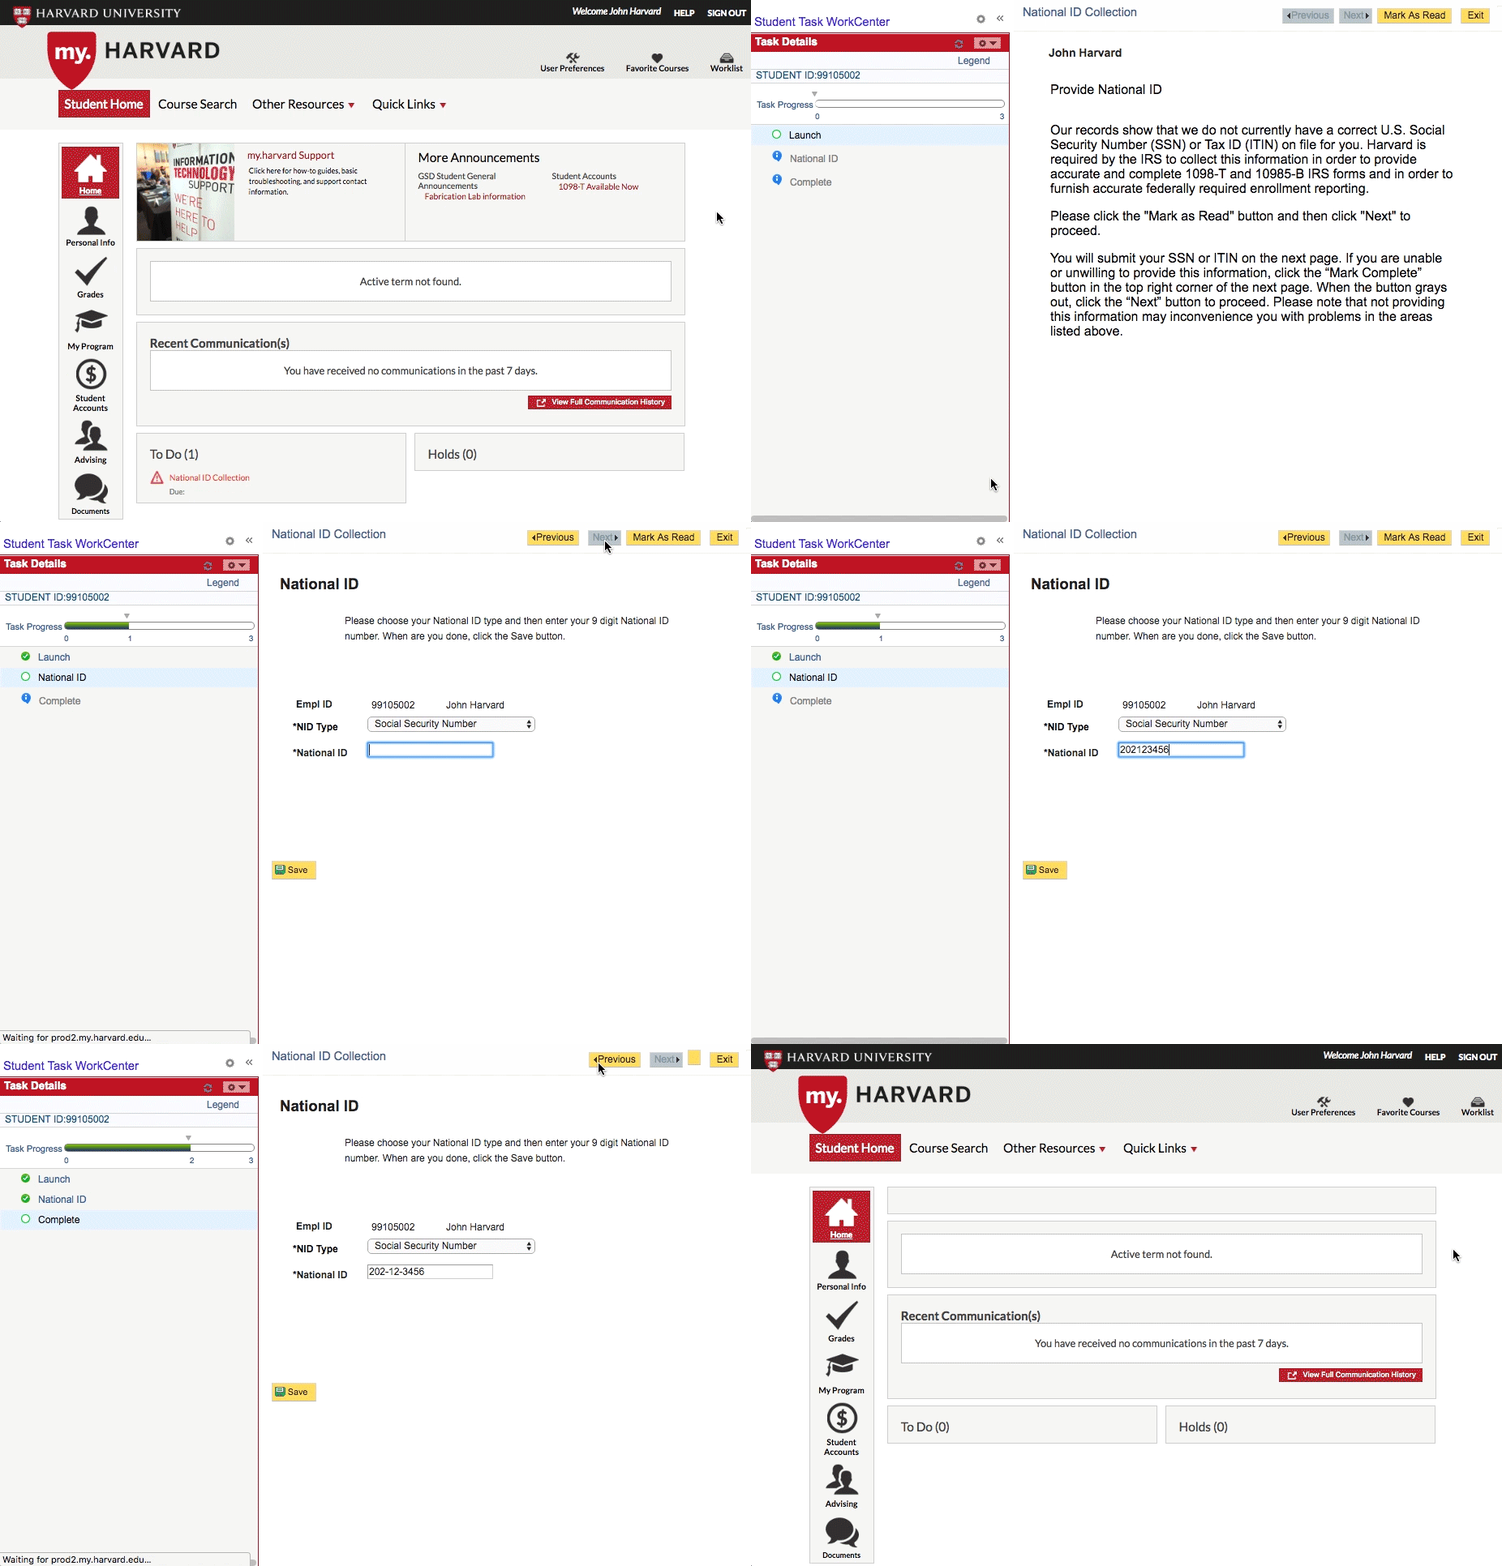
Updating SSN or ITIN when "National ID Collection" appears as a To-Do prompt
Your National ID (SSN/ITIN) is requested by Harvard to ensure compliance with federal tax and academic reporting guidelines. If, while creating 1098-T tax documents, we don't already have your SSN or ITIN, your "to do" list in my.harvard will prompt you to submit the number online.
1. Navigate to the Student Home page
2. In your "to do" list at the bottom of the page, click National ID Collection
3. Click Mark as Read at the top of the next page when done reading. Then click Next.
4. On the National ID page, choose your ID type and enter the 9-digit number. When done, click Save (If you're unwilling or unable to enter this number, click Mark Complete, then Next)
5. Click Finish to complete the process
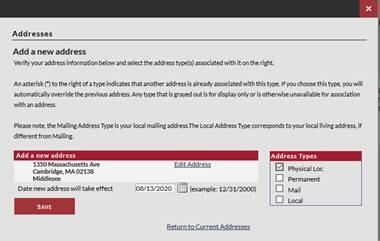
Update/Create a Physical Location Address in my.harvard
1. Click on the Personal Info tab, in the left-hand menu of the Student Home page.
2. Click Edit Address (shown in the bottom right-hand corner)
3. Click Add a New Address
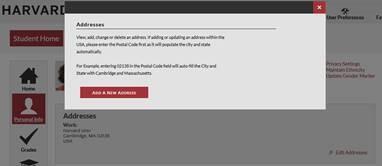
4. Enter your street address in Address Line(s) 1, 2 and 3 as appropriate
5. Enter your Postal zip code (as this will auto-populate the City, State, and Country fields)
6. Click OK to proceed to updating the address type
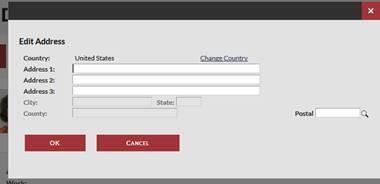
7. Select the Physical Loc address type
8. Click Save
Delegate How-To
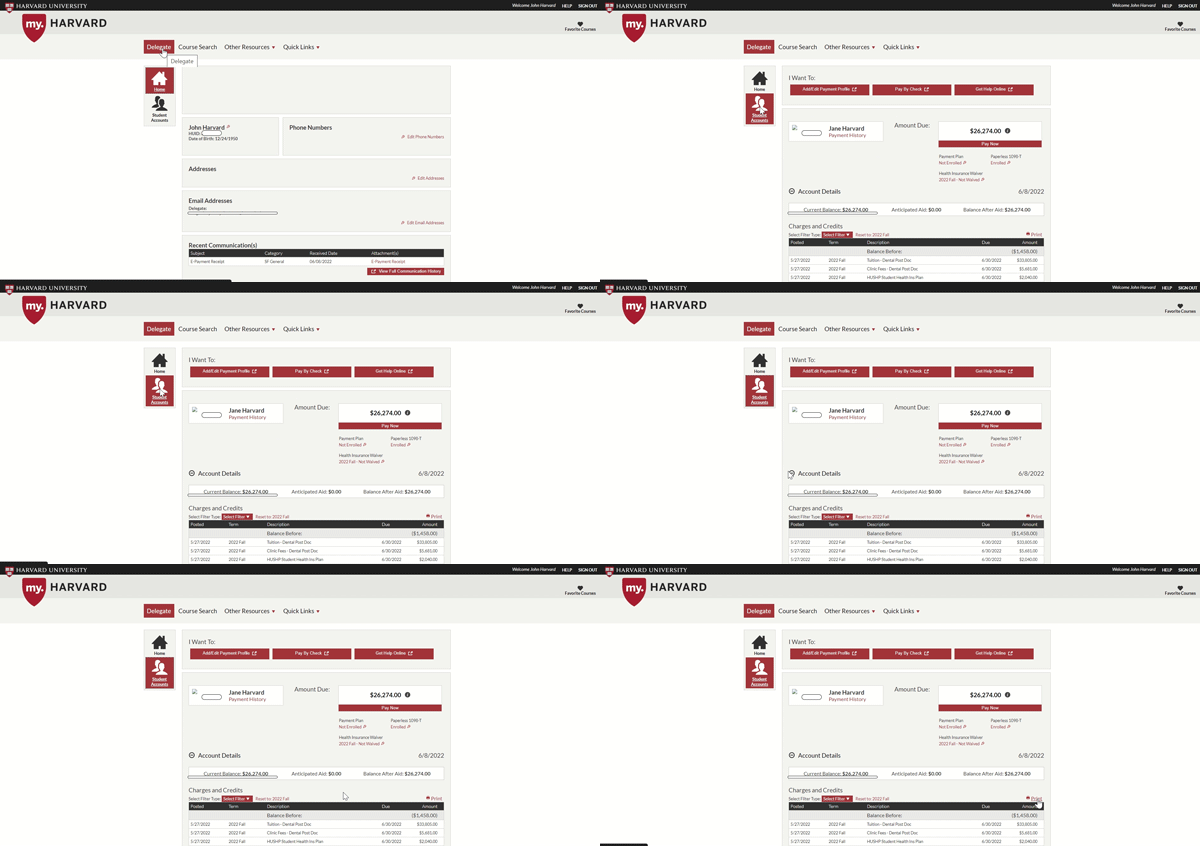
Find Student's Harvard ID (HUID)
All student account inquiries should include the student's Harvard ID number (HUID), which can be found in the my.harvard portal.
- Navigate to the Student Account by selecting Delegate from the top menu
- Go to the Account Details section, below Amount Due (Expand by clicking on the plus sign (+), if the section is minimized)
- Click on the red Print icon to the far right of Charges and Credits
- The HUID can be found in the top right of the print preview
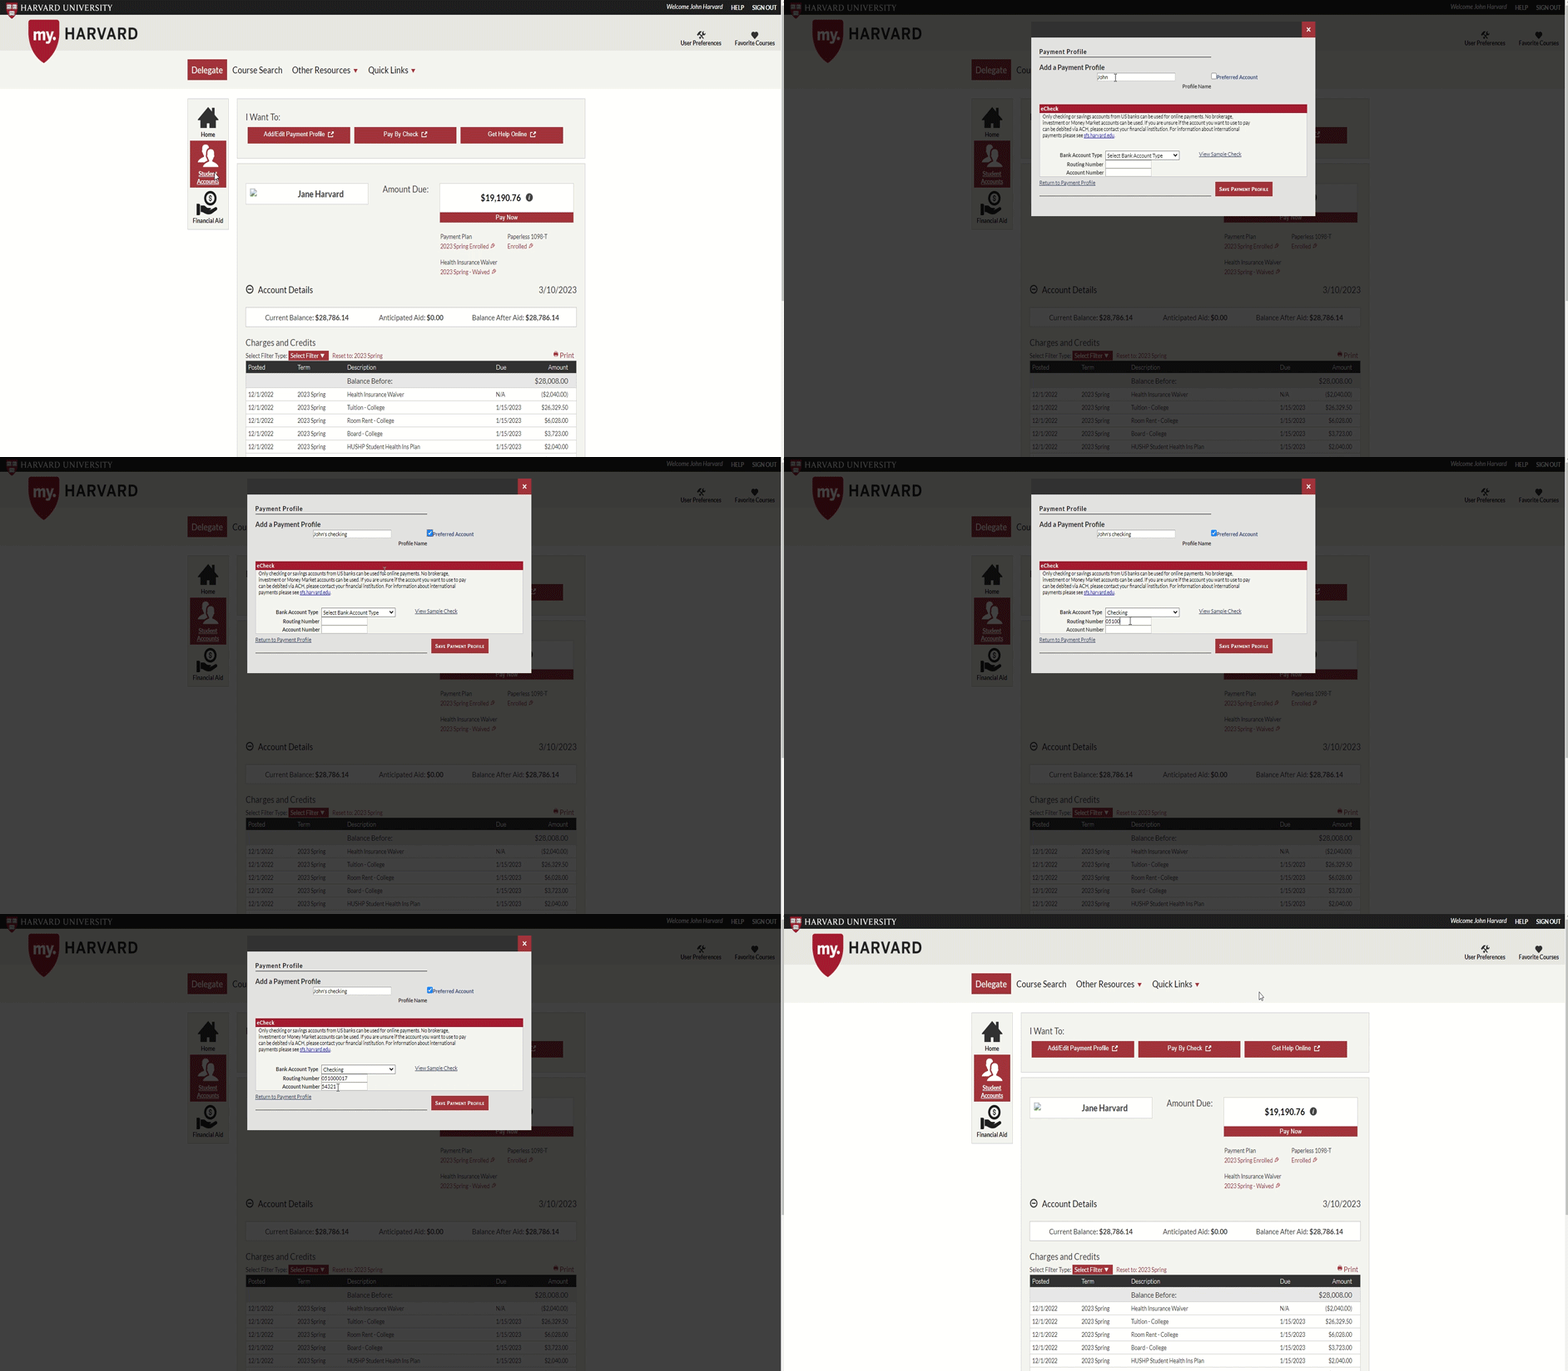
Creating a Payment Profile allows you to securely enter your U.S. checking or savings account information and save it to use whenever you need to make a payment. You can create separate payment profiles for separate bank accounts.
-
From the Delegate tab in the top menu, navigate to the Student Accounts page
-
In the section above Amount Due, click the link under Payment Profile or click ("I Want To:") Add/Edit Payment Profile
-
Click Add a Profile
-
Give your profile a name and (optionally) check the box for Preferred Account
-
Enter your routing and account number
-
Click Save Payment Profile to complete
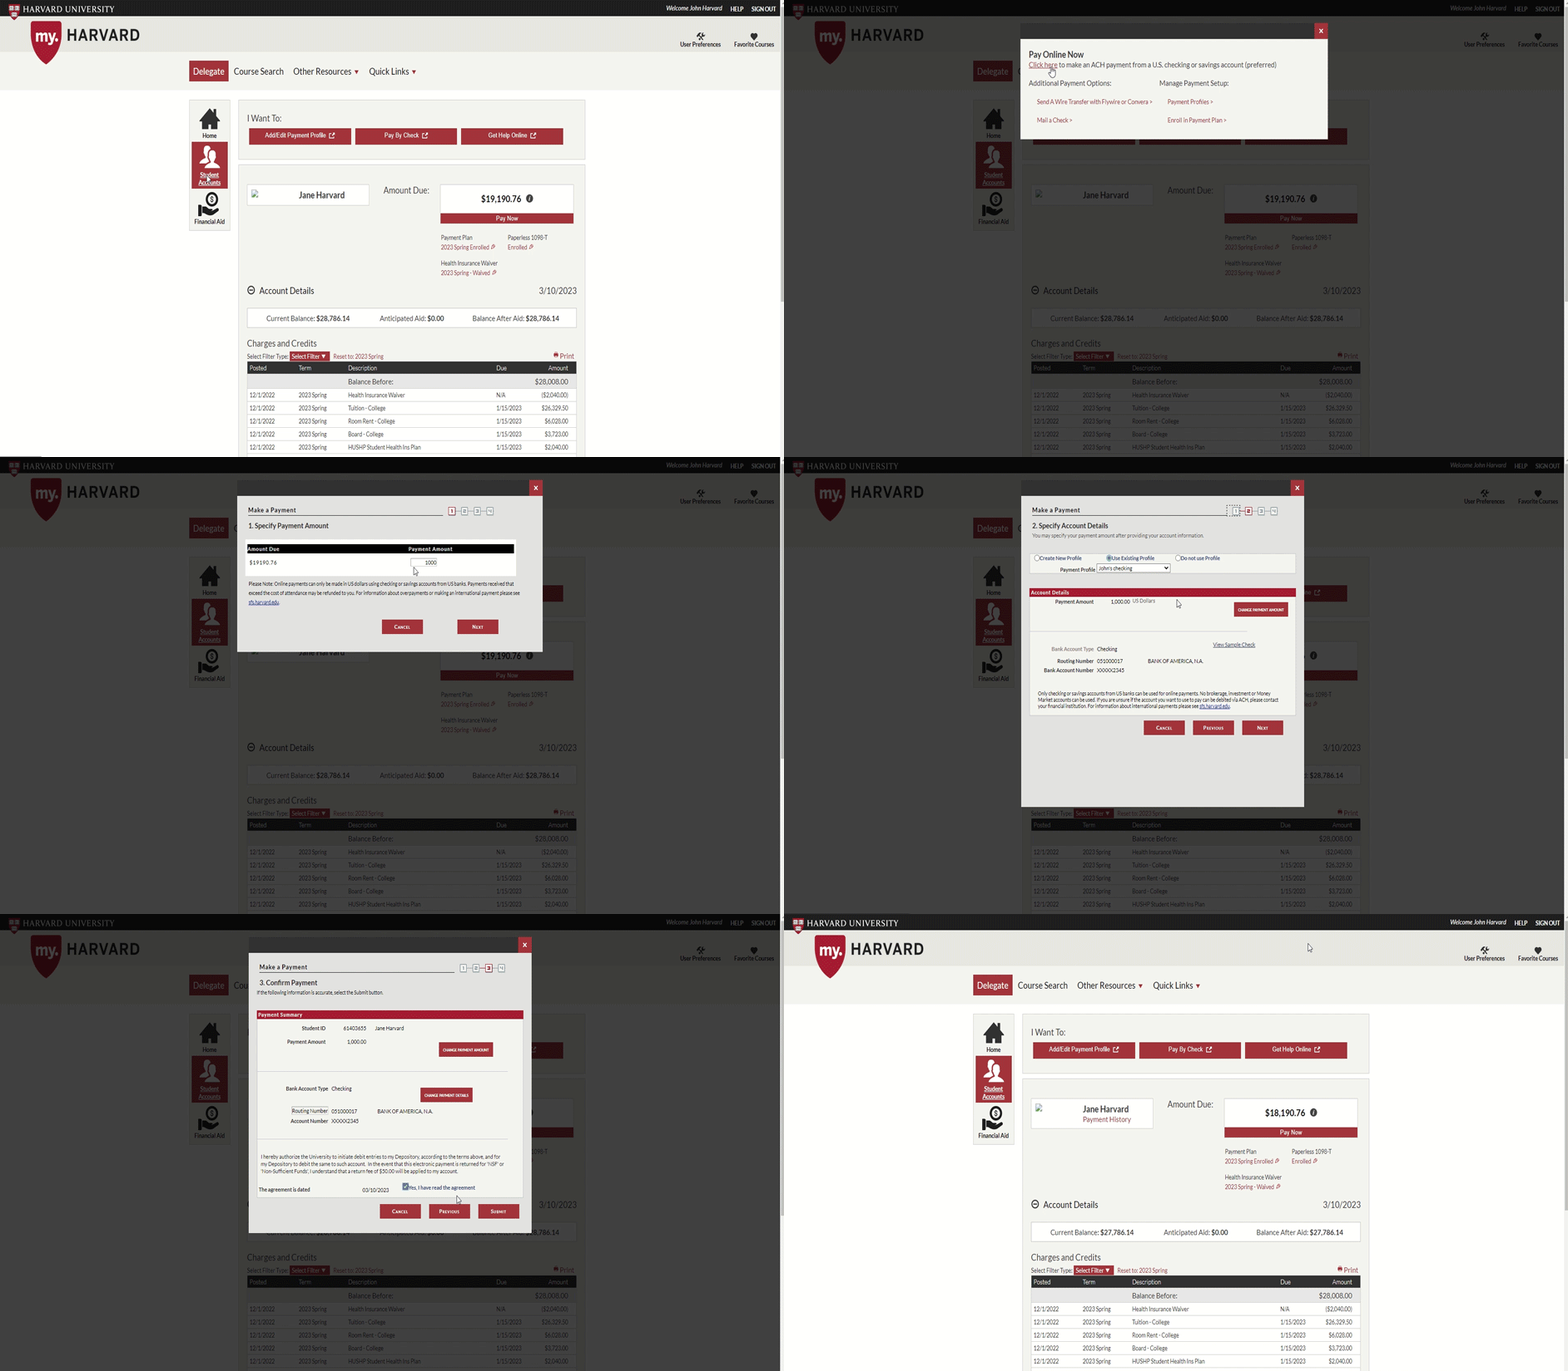
Initiate an electronic transfer of funds from your U.S. checking or savings account to pay due charges on your student's account.
-
From the Delegate tab in the top menu, navigate to the Student Accounts page
-
Beneath the Amount Due box, select Pay Now
-
From the pop-up, select Pay Online Now (Please note that you can also pay by wire transfer or check, but online payments are the most efficient (and our preferred) method)).
-
Enter the amount that you would like to pay (This does not have to be the same as the amount due)
-
Use an existing payment profile, save account information for a new profile, or choose not to save your payment information
-
If you do not select an existing profile, enter your bank information* (Please ensure you have the correct routing and account number)
-
Select Next
-
Check the agreement box, and select Submit
*Unfortunately, no brokerage, investment, or Money Market accounts can be used. If you are not sure whether your account can be debited via ACH, please contact your financial institution before making the payment.
Enroll in Monthly Payment Plan
Details about terms and eligibility for the Monthly Payment Plan are available here.
-
From the Delegate tab in the top menu, navigate to the Student Accounts page
-
In the Amount Due section, click the link under Payment Plan
-
Select the plan and click Next
-
Read and agree to terms. Select Enroll
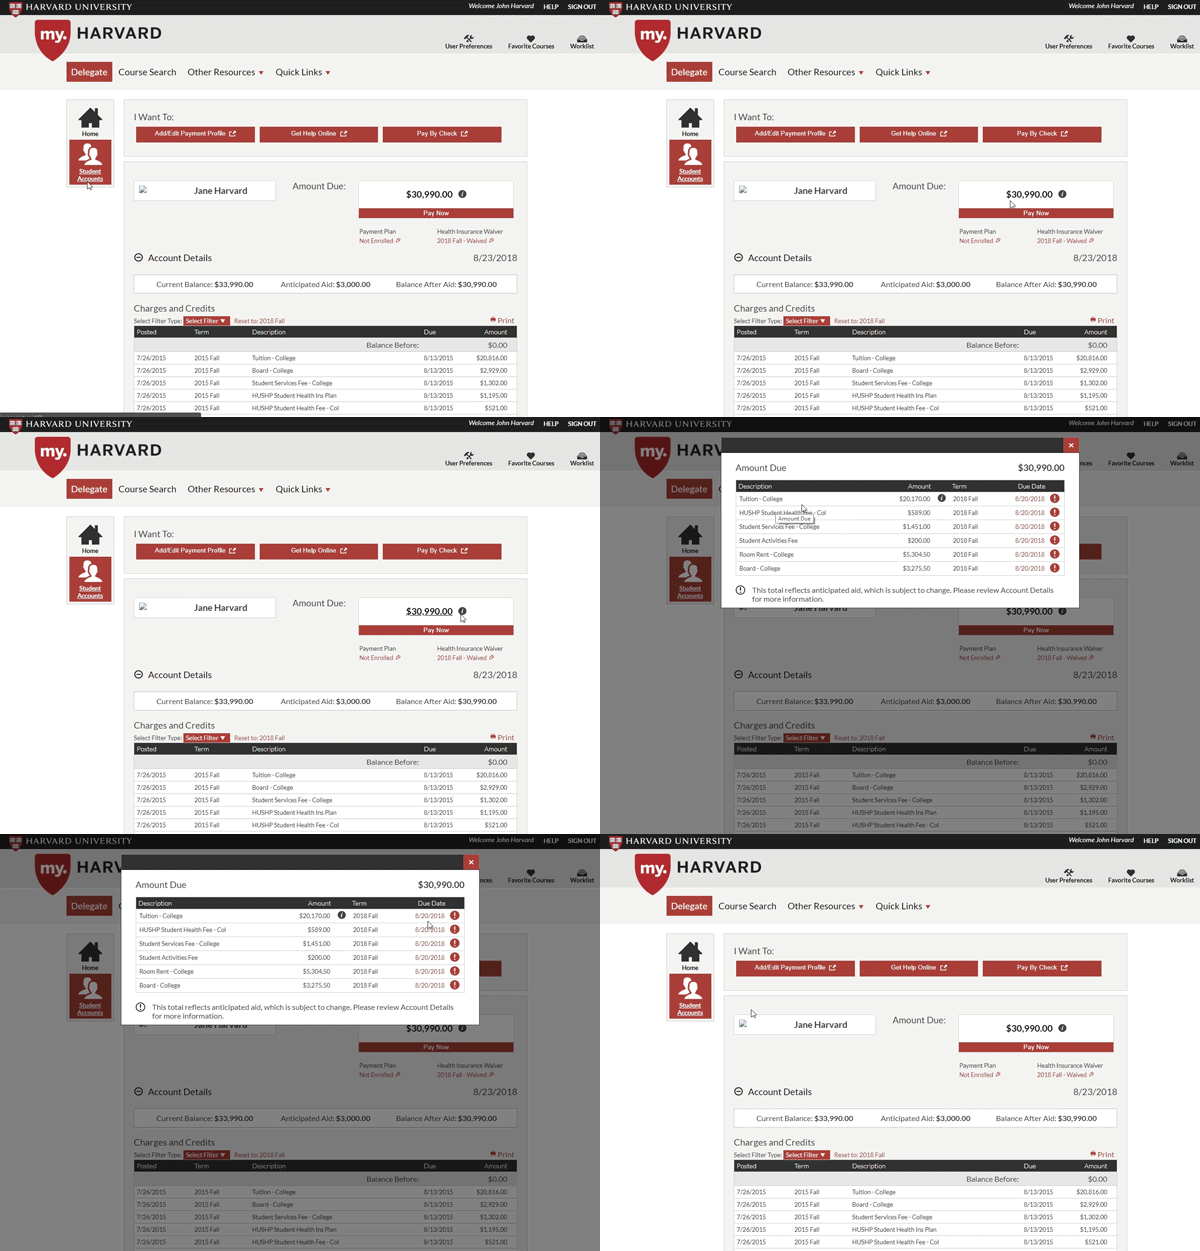
Review Student's Amount Due and Due Date
-
Choose the Delegate tab, then navigate to the Student Accounts page by selecting it from the left-hand menu
-
Click the Information Icon ("i") in the Amount Due box to view current and future due charges.
-
Due dates, which vary by school, can be found in the far-right column.
-
If an information icon appears next to a charge, this means that the charge has been partially paid off or is partially covered by anticipated aid
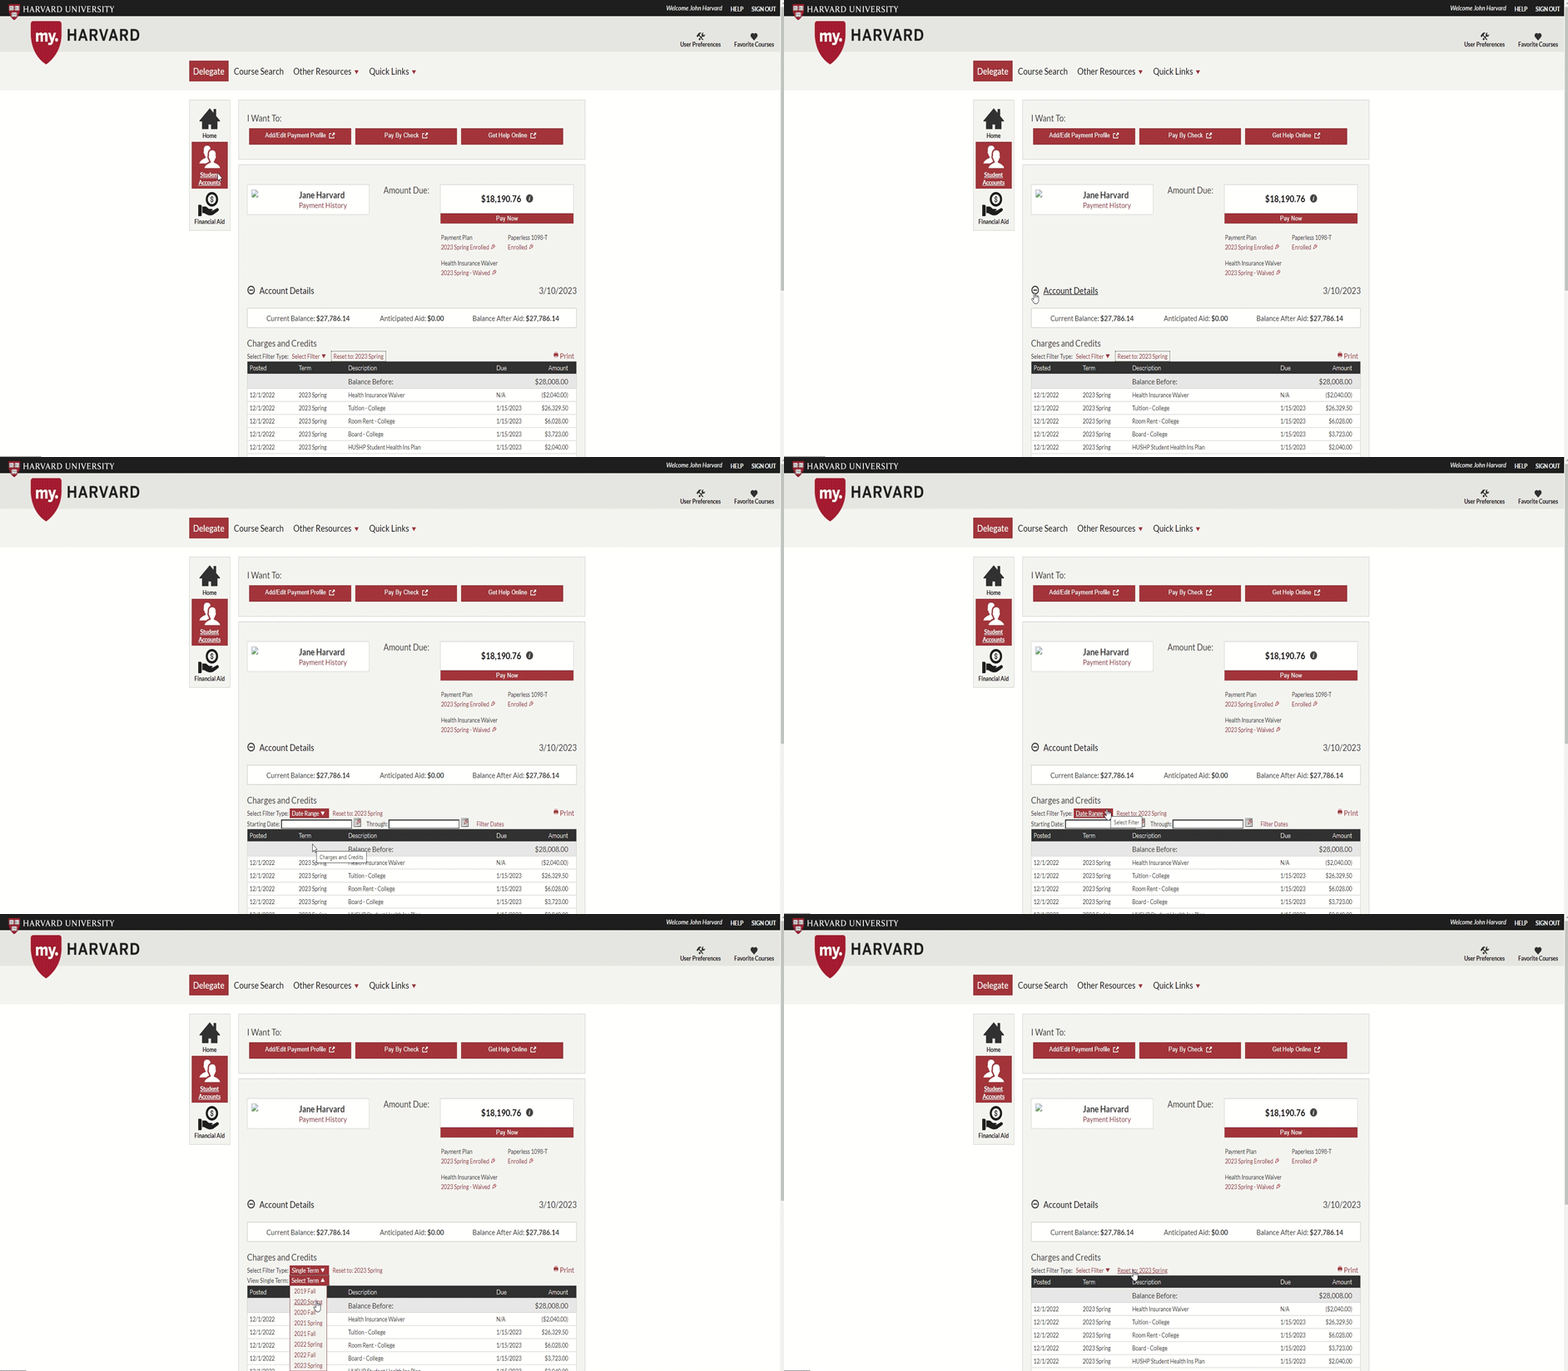
Review Student's Account Details
-
From the Delegate tab in the top menu, navigate to the Student Accounts page
-
Expand (+) the Account Details section (for Delegates with one student, this section is expanded by default)
-
Filter your student's transactions by date or term – see filter options under "Charges and Credits"
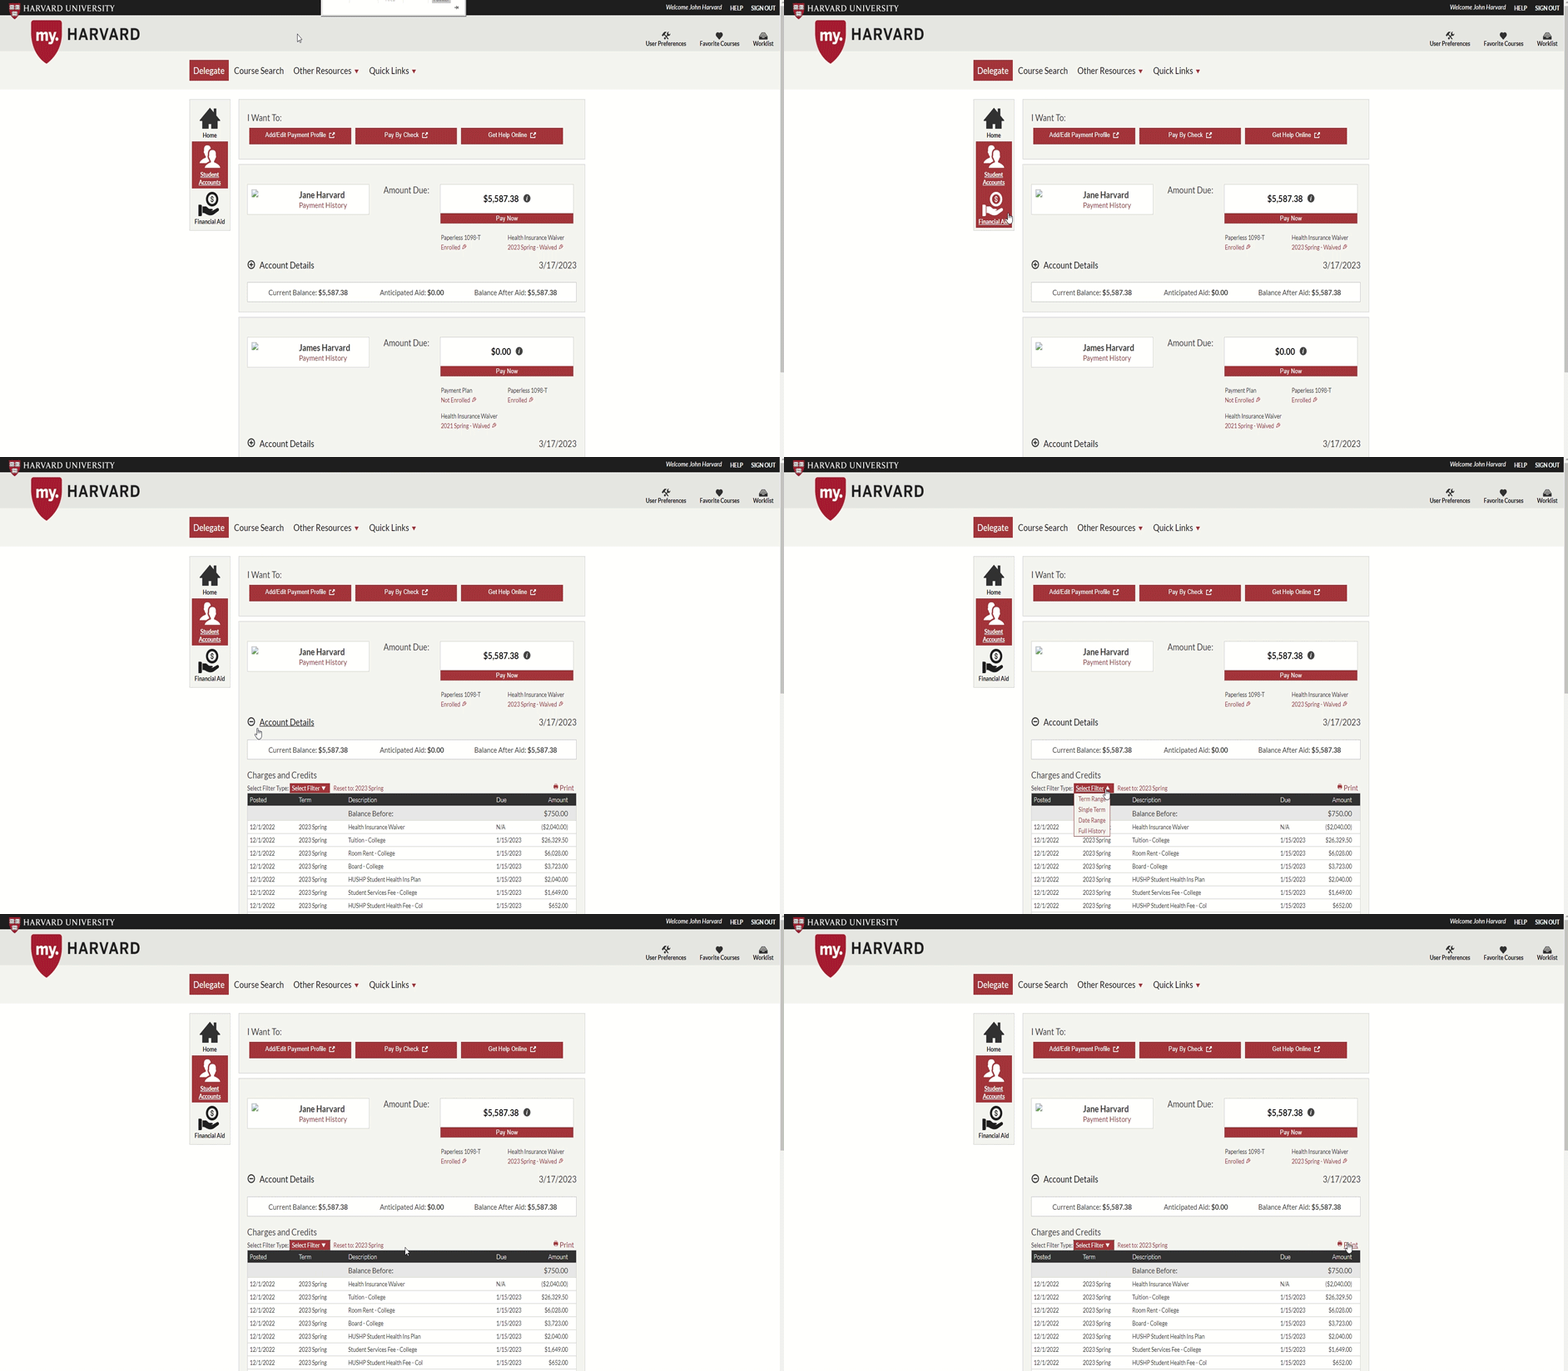
Print Student's Account Statement
-
From the Delegate tab in the top menu, navigate to the Student Accounts page
-
Expand the Account Details section (for Delegates with one student, this section is expanded by default)
-
Filter your student's transactions by date or term – see filter options under Charges and Credits
-
Click on the red Print icon to the far right of Charges and Credits
